
Main Courses
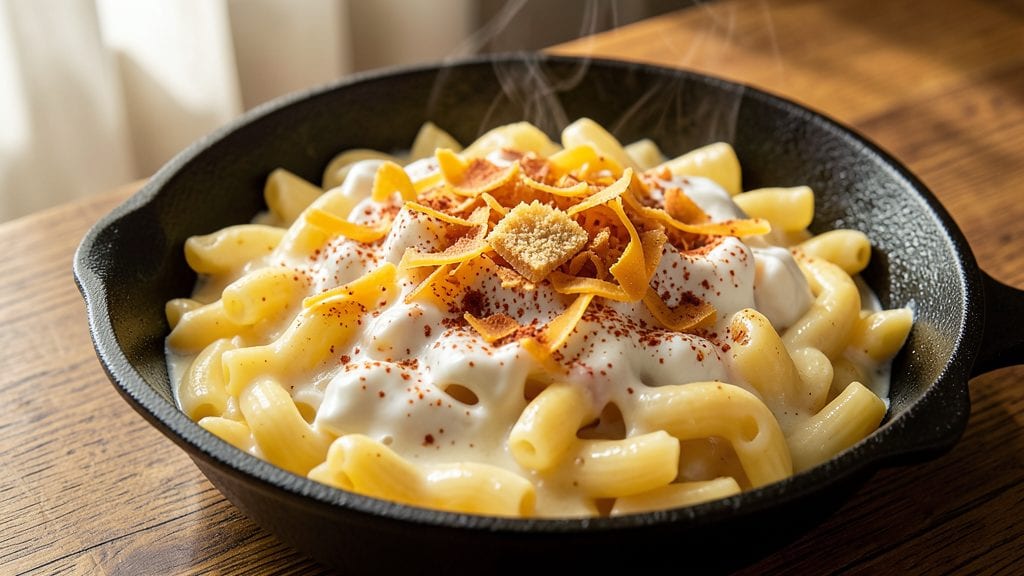
This stove-top creamy mac and cheese recipe delivers restaurant-quality results with just one pot and minimal effort—no oven required. The secret lies in a precise roux technique and careful cheese melting, creating a velvety sauce that coats every noodle perfectly.
After years of testing different methods, I've perfected this approach to eliminate lumps and maximize creaminess, ensuring foolproof results every time.
The beauty of this method is its simplicity: combine elbow macaroni, milk, and a rich cheese blend in a single pot, then simmer until the sauce thickens into a luxurious consistency. Sharp cheddar provides bold flavor, while cream cheese adds that signature smoothness, while a touch of mustard prevents graininess.
The entire process takes about 30 minutes, making it ideal for busy weeknights when you crave comfort food without the fuss.
What you'll end up with is a creamy, ultra-smooth mac and cheese that's rich enough to satisfy cravings but balanced so it doesn't feel heavy. The texture is velvety with just the right bite, and the golden crust on top adds an irresistible crunch.
This version holds its shape when served, so every forkful delivers that perfect combination of cheesy goodness and tender pasta.
Serve immediately as a hearty main course or let it cool slightly for a satisfying lunch the next day. The one-pot method means easy cleanup, while the customizable cheese blend lets you adjust the flavor to your preference—whether you prefer extra sharp cheddar or a milder variety.
Here's how to make it perfectly every time.
Ingredients for stove top creamy mac and cheese
Pantry staples plus a few key cheeses—this one-pot mac transforms simple ingredients into creamy perfection.
| Ingredient | Amount | Notes |
|---|---|---|
| Elbow Macaroni 🍝 | 12 oz | Dry, medium or elbow shape |
| Unsalted Butter 🧈 | ½ cup | Cold, cut into small cubes |
| All-Purpose Flour 🌾 | ¼ cup | Sifted, for smooth roux |
| Sharp Cheddar Cheese 🧀 | 2 cups | Shredded, extra sharp preferred |
| Cream Cheese 🧀 | 8 oz | Full-fat, cut into chunks |
| Whole Milk 🥛 | 2 cups | Room temperature, 2% works too |
| Yellow Mustard 🍯 | 1 tbsp | Dijon or American style |
| Salt 🧂 | 1 ½ tsp | Kosher or sea salt |
| Black Pepper 🌶️ | ½ tsp | Freshly ground preferred |
| Panko Breadcrumbs 🍞 | ¼ cup | For crispy topping |
| Extra-Virgin Olive Oil 🫒 | 1 tbsp | For finishing drizzle |
| Garlic Powder 🧄 | ½ tsp | For extra flavor depth |
The cheese makes all the difference here. Sharp cheddar is non-negotiable for that tangy kick—Kraft 2% Milk Sharp is my go-to, but any extra sharp works. Cream cheese adds the velvety texture, so full-fat is a must (low-fat gets grainy). For the roux, cold butter is crucial—it prevents burning and creates those tiny flavorful bits. If you're feeling fancy, grab Parmigiano-Reggiano to mix in at the end for an umami boost. The macaroni? Barilla or De Cecco hold up best during cooking.
No sharp cheddar? Monterey Jack or pepper jack softens the flavor but still works. Running out of cream cheese? Substitute with 4 oz cream cheese plus 2 oz extra sharp cheddar for similar texture. The mustard seems small but prevents lumpiness—don't skip it. For the milk, half-and-half makes it richer, but whole milk keeps it balanced. The panko topping can be swapped for crushed Ritz crackers if that's what you've got. And if you're watching calories, reduce the butter to 3 tbsp—it'll still taste amazing.
This reheats beautifully—just add a splash of milk to loosen it up. Keeps 4-5 days in the fridge, though it's best fresh. For make-ahead meals, assemble everything except the milk, then refrigerate overnight and cook straight from cold. The breadcrumbs crisp up best when toasted in a dry pan for 2 minutes before adding. Store leftovers covered to prevent drying out—microwave with a damp paper towel for 30 seconds to restore creaminess.
Why You'll Love This Recipe
- One-Pot Magic: I swear by this recipe—no strainers, no extra bowls, just elbow macaroni cooking right in the creamy cheese sauce. The moment the pasta absorbs that velvety blend of sharp cheddar and cream cheese? Pure, lazy-cook satisfaction.
- Cheese Overload (The Good Kind): Sharp cheddar and cream cheese team up for a sauce that’s actually creamy—not watery, not grainy, but thick and luxurious. Honestly, I’ve tried boxed versions, but this? This is the kind of mac and cheese that makes you lick the pot.
- Leftover Hero: This recipe actually improves the next day. The sauce gets even richer when reheated, and it’s the perfect lunchbox filler for kids (or adults, let’s be real). I make a double batch on Sundays just for this reason—zero waste, all comfort.
- Budget Comfort: Butter, flour, and cheese? That’s it for the fancy stuff, and the rest is pantry staples. Between us, this is the mac and cheese I turn to when I’m broke but refuse to compromise on taste. Plus, it stretches easily—feed a crowd or save leftovers for days.
Step-by-step instructions for stove top creamy mac and cheese
Here's how to make this ultra-smooth, one-pot masterpiece with minimal cleanup.
Cook the Pasta in Butter
In a large, deep skillet or Dutch oven, melt the 0.5 cup unsalted butter over medium heat. Once fully melted and foaming subsides, add the 12 oz elbow macaroni and stir to coat the noodles evenly in the butter.
Add 2 cups whole milk, 1.5 tsp salt, 0.5 tsp black pepper, and 1 tbsp yellow mustard. Bring to a gentle boil, then reduce heat to medium-low and cook uncovered for 12-15 minutes, stirring occasionally. You're looking for pasta that's al dente—still slightly firm to the bite when you taste it. Don't overcook or the sauce will be too thin to cling properly.
Build the Creamy Cheese Sauce
While the pasta cooks, shred the 2 cups sharp cheddar cheese and cut the 8 oz cream cheese into small chunks. When the pasta is nearly done, sprinkle 0.25 cup all-purpose flour evenly over the mixture and stir vigorously for 1-2 minutes to create a smooth roux. This helps thicken the sauce beautifully.
Add the shredded cheddar and cream cheese chunks, then stir constantly for 3-4 minutes until the cheese melts completely and the sauce becomes thick and glossy. If the mixture looks too thick, add 1-2 tablespoons of pasta water to loosen it. The sauce should coat the back of a spoon without being gluey. Here's the thing—don't walk away. Cheese burns easily, and you want that perfect creamy texture without any graininess.
Add Garlic and Finish with Crispy Topping
Remove the skillet from heat and stir in the 0.5 tsp garlic powder. This adds subtle depth that makes the whole dish sing. In a small bowl, mix the 0.25 cup panko breadcrumbs with 1 tbsp extra-virgin olive oil until evenly coated. Spread this mixture evenly over the top of the mac and cheese.
Return the skillet to low heat just until the breadcrumbs turn golden brown and crispy—about 2-3 minutes. Watch carefully so they don't burn. The crispy topping adds a wonderful textural contrast to the creamy base. For best results, serve immediately while the sauce is still warm and the topping is crisp. This isn't something you want to reheat—it's best enjoyed fresh from the stove.
Pro Tips For Making Stove Top Creamy Mac And Cheese
- Cook pasta al dente: DESCRIPTION: I learned this the hard way—undercooked pasta turns mushy in the sauce, while overcooked pasta gets gummy. Boil elbow macaroni in salted water for 1 minute less than the package says, then finish cooking in the cheese sauce. The residual heat will carry it through without turning it into glue.
- Melt cheese slowly: DESCRIPTION: Dumping shredded cheddar and cream cheese into hot liquid makes it seize up like scrambled eggs. Lower the heat to medium-low once the roux forms, then add cheese in two batches, stirring constantly. Let it melt before adding the pasta—this keeps the sauce silky, not clumpy.
- Avoid flour lumps: DESCRIPTION: Skimping on whisking the butter-flour mix is how you end up with gritty texture. Cook the roux for 2-3 minutes until it’s a golden, nutty color, then whisk in cold milk (if using) gradually. If you’re lazy like me, use a hand mixer—just don’t walk away.
- Reserve pasta water: DESCRIPTION: The sauce might look thick, but adding ½ cup pasta water at the end makes all the difference. It loosens the sauce just enough to coat the noodles without turning the dish into a brick. Keep a ladle nearby—you’ll need it.
Make-ahead tips for this dish
Prep Ahead for Effortless Cooking
Assemble everything except the milk in an airtight container—cheese, butter, flour, pasta, and seasonings—then refrigerate overnight. When ready to cook, simply add the milk and follow the stovetop instructions.
This 30-minute shortcut saves you time while keeping flavors intact. I do this weekly for busy nights, and it never disappoints. 💡
Freezer-Friendly Assembly
For a true make-ahead meal, cook the pasta al dente (just 1 minute less than package instructions), drain, and toss with 1 tbsp butter to prevent sticking. Store in a freezer-safe container for up to 3 months.
When ready to serve, reheat with milk and cheese—just add ½ cup milk per 2 cups cooked pasta and simmer until creamy. The texture stays perfect, and the flavors meld beautifully. ❄️
Reheating Like a Pro
Microwave reheating works best in 1-minute intervals on 50% power, stirring between each interval. For stovetop, add ¼ cup milk or water to loosen the sauce and heat on low-medium until bubbly.
Cover with a damp paper towel to restore creaminess—this prevents drying out. I avoid reheating the crispy topping; instead, add fresh panko after warming. 🔥
Portion Control for Meal Prep
Divide into 4 individual airtight containers before refrigerating to maintain texture. Each serving reheats evenly, and you can customize toppings per portion—add bacon bits to one, green onions to another.
Label containers with dates to track freshness. This method keeps the dish tasting freshly made for up to 5 days. 📅
Cheese Prep Shortcut
Shred all cheese the night before and store in a ziplock bag in the fridge. Pre-measure spices and store in small jars for quick access. I even pre-mix the panko and olive oil in a separate container.
These small prep steps cut active cooking time by half while ensuring perfect consistency every time. 🧀
Overnight Storage Secrets
If storing overnight, press plastic wrap directly onto the surface to prevent a skin from forming. Reheat gently the next day—this preserves the creamy texture. For extra insurance, add a splash of milk when reheating to compensate for any moisture loss during storage.
The dish reheats beautifully and tastes just as good as fresh. 💫
Nutrition facts
Frequently asked questions
Why does my stovetop mac and cheese turn out grainy?
Graininess usually happens when cheese melts unevenly or the sauce gets too hot. Always stir constantly while melting cheese over low-medium heat, and never let it boil. The mustard in this recipe helps prevent lumps by stabilizing the emulsion. If it still happens, try grating your own cheese instead of using pre-shredded (pre-shredded has anti-caking agents that cause separation).
Can I make this recipe with less cheese?
Reduce the sharp cheddar to 1.5 cups and cream cheese to 6 oz for a lighter version. For extra creaminess without extra cheese, stir in 2 tbsp cornstarch with the flour during the roux step. The texture will stay rich but with fewer calories. Just remember to reduce the milk slightly if cutting cheese to maintain balance.
What's the best way to reheat leftovers?
For stovetop reheating, add ¼ cup milk or water per 2 cups of mac and cheese and warm on low heat until bubbly. Microwave in 1-minute intervals on 50% power, stirring between each. Cover with a damp paper towel to restore creaminess. Never reheat the crispy topping—add fresh panko after warming for the best texture.
Can I use a different type of pasta?
Elbow macaroni is ideal because its shape holds the creamy sauce perfectly, but you can substitute with penne or cavatappi in a pinch. Avoid long, thin noodles like spaghetti—they won't coat well in the sauce. For gluten-free, use a high-quality GF elbow macaroni and add 1 tbsp cornstarch to the roux to help thicken the sauce properly.
How do I fix if my sauce is too thin?
If the sauce separates or looks too thin, remove from heat and stir in 1 tbsp cornstarch mixed with 2 tbsp cold water to create a slurry. Simmer for 1-2 minutes until thickened. For extra insurance, keep the pasta slightly al dente when cooking—overcooked noodles release too much starch and can thin the sauce. The roux step is key to preventing this!