
Main Courses
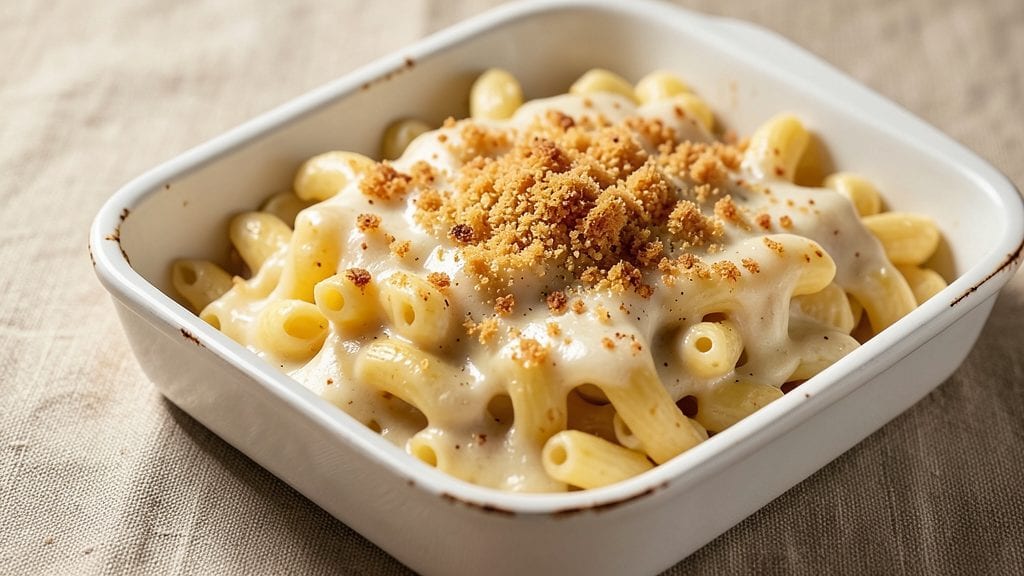
Creating Stouffer's macaroni and cheese at home delivers that nostalgic, gooey comfort food experience with a crispy breadcrumb crown that's impossible to resist. The secret lies in the perfect balance between tender pasta, rich cheese sauce, and that golden, crunchy topping—just like the classic you remember.
I first perfected this recipe during a particularly cold Portland winter when I needed a dish that could feed my family without requiring much effort beyond opening the oven door.
This version stays true to the original while offering modern flexibility—whether you're using sharp cheddar or a vegan cheese alternative.
The key steps involve cooking the pasta just shy of al dente, building a velvety cheese sauce from scratch, and topping it with a buttery breadcrumb mixture that turns golden and crispy in the oven.
The result is a dish that's hearty enough for a family dinner but simple enough for a weeknight meal.
By the time it emerges from the oven, you'll have a bubbling, cheesy masterpiece with that signature crispy crown that everyone reaches for first. The cheese swirls peek through the golden topping, promising melt-in-your-mouth comfort with every bite.
This is the kind of dish that transforms an ordinary evening into a cozy, satisfying experience—just like the ones from your favorite childhood memory.
The beauty of this recipe is its versatility—serve it as a main dish with a simple green salad or pair it with roasted vegetables for a complete meal.
The leftovers reheat beautifully, making it perfect for meal prep or feeding a crowd. Let's get started on recreating this timeless classic in your own kitchen.
Ingredients for stouffer's macaroni and cheese
Pantry staples and a few key ingredients transform into that nostalgic, gooey mac and cheese with a crispy crown.
| Ingredient | Amount | Notes |
|---|---|---|
| Elbow Macaroni 🍝 | 12 oz | Cooked al dente, drained well |
| Sharp Cheddar Cheese 🧀 | 2 cups | Shredded, block preferred |
| Milk 🥛 | 2 cups | Whole milk for creaminess |
| Butter 🧈 | ½ cup | Unsalted, melted |
| All-Purpose Flour 🌾 | ¼ cup | For velvety sauce |
| Mustard Powder 🌶️ | ½ tsp | For tangy depth |
| Salt 🧂 | 1 ½ tsp | Adjust to taste |
| Black Pepper 🌶️ | ½ tsp | Freshly ground |
| Panko Breadcrumbs 🍞 | ½ cup | For crispy crown |
| Parmesan Cheese 🧀 | ¼ cup | Freshly grated |
| Garlic Powder 🧄 | ½ tsp | For subtle flavor |
| Dried Parsley 🌿 | ½ tsp | Optional garnish |
The cheese is where magic happens—sharp cheddar from a block melts smoother than pre-shredded (no clumps!). I grab mine from Whole Foods or the deli counter at Trader Joe's because the flavor is unstoppable. For the breadcrumbs, Panko is non-negotiable—it stays crispy. If you're feeling fancy, toast it in butter for extra richness. The elbow macaroni should be cooked just shy of al dente so it doesn't turn mushy under all that cheese. And trust me, whole milk makes the sauce velvety instead of watery.
No sharp cheddar? Monterey Jack or Gruyère work in a pinch—just add a splash of milk to help them melt. Pre-shredded cheese? Toss it with a little flour to absorb moisture and cut clumps. Out of Panko? Toasted breadcrumbs or crushed cornflakes give similar crunch. The mustard powder might sound weird, but it cuts through the richness and keeps the sauce from tasting too heavy. If you're avoiding dairy, nutritional yeast or vegan cheese can stand in, but the texture won't be identical—still delicious, though!
This reheats like a dream—just cover with foil and pop in the oven for 10 minutes. Keeps for 3-4 days in the fridge, but honestly, it disappears faster. For meal prep, assemble the dish without baking, then refrigerate. Bake straight from the fridge for 15-20 minutes to get that perfect crispy crown. Freezes beautifully too—just add 5-10 minutes to the baking time after thawing. The leftovers? Even better the next day when everything melts together.
Why You'll Love This Recipe
- One-Pot Magic: I swear by this recipe because it’s literally one pot—no strainers, no extra bowls, just melt the butter, toast the flour, add milk, and let that sharp cheddar transform everything into a velvety, cheesy hug. The elbow macaroni cooks right in the sauce, so you’re not left with a sink full of dishes.
- Cheese Overload (In a Good Way): That sharp chedddar? It’s the star. I use the good stuff—none of that pre-shredded powdery nonsense—and the moment the sauce thickens, the aroma hits like a warm blanket. Honestly, the first time I made this, I took a bite and immediately went back for seconds without even tasting the pasta.
- Weeknight to Potluck Hero: Between us, this is my go-to for lazy nights, but it also slays at gatherings. Double the batch, bake it in a cast-iron skillet, and it’s a crowd-pleaser—whether it’s a last-minute dinner or a church potluck. My roommate’s vegetarian friends actually ask for it now.
- Budget Comfort, No Guilt: Sharp chedddar and elbow macaroni are cheap, and this recipe stretches them into something luxurious. I make a big batch on Sundays, and it lasts me four days of lunches—no sad leftovers here. Plus, the flour-butter roux makes it feel fancy, even though it’s basically just milk and pasta.
Step-by-step instructions for Stouffer's macaroni and cheese
Here's how to make restaurant-style mac and cheese with that perfect crispy crown.
Cook the Elbow Macaroni Al Dente
Bring a large pot of water to a rolling boil and add the 12 oz elbow macaroni. Cook until it's 1 minute before the package directions say "al dente" - you want it slightly undercooked because it'll finish in the oven. Drain the pasta in a colander and rinse it briefly with cold water to stop the cooking process. Shake the colander gently to remove excess water, then transfer the drained pasta to a large bowl.
I like to leave the pasta slightly undercooked because it continues cooking in the oven while the cheese melts. This ensures each bite has that perfect texture - tender pasta with gooey cheese. Don't rinse too thoroughly or the sauce won't cling properly to the noodles later.
Make the Creamy Cheese Sauce
In a medium saucepan, melt the 0.5 cup butter over medium heat. Once melted, whisk in the 0.25 cup all-purpose flour to create a roux. Cook for 1-2 minutes until the mixture turns a light golden color and smells nutty.
Slowly pour in the 2 cups milk while whisking constantly to prevent lumps from forming. Add the 2 cups sharp cheddar cheese, 0.5 tsp mustard powder, 1.5 tsp salt, and 0.5 tsp black pepper. Stir continuously until the cheese is completely melted and the sauce thickens to a pudding-like consistency. This should take about 5-7 minutes of gentle simmering.
Combine Pasta and Sauce
Pour the creamy cheese sauce over the drained elbow macaroni in the bowl. Using a spatula, gently fold the pasta and sauce together until every noodle is fully coated. The mixture should look glossy and well-combined. Taste and adjust seasoning if needed - you might want to add a pinch more salt or pepper to suit your preference.
Transfer the pasta mixture to a greased 8x8-inch baking dish. Smooth the top with a spatula to create an even surface. At this point, the dish should look smooth and inviting, with no dry spots showing. This is where the magic happens - the even distribution ensures perfect melting in the oven.
Create the Crispy Breadcrumb Crown
In a small bowl, mix together the 0.5 cup panko breadcrumbs, 0.25 cup parmesan cheese, 0.5 tsp garlic powder, and 0.5 tsp dried parsley. Sprinkle this mixture evenly over the top of the macaroni and cheese in the baking dish. Use your fingers to gently press the breadcrumb mixture into the cheese, creating a textured surface that will become crispy.
This step is what makes this recipe special - the crispy breadcrumb crown contrasts beautifully with the creamy cheese below. Don't press too hard or you'll lose the texture. The breadcrumbs should cover the entire surface evenly, with no gaps showing the cheese underneath.
Bake Until Bubbly and Golden
Preheat your oven to 375°F. Bake the macaroni and cheese for 20-25 minutes until the top is golden brown and the cheese is fully melted and bubbling. You'll know it's ready when the edges look crispy and the center has just a slight jiggle when you shake the dish.
Let the macaroni and cheese rest for 5 minutes before serving. This resting time allows the cheese to set slightly, making it easier to slice and serve. The crispy breadcrumb crown should be golden and crunchy while the cheese underneath remains creamy and gooey. Serve immediately with a side of steamed vegetables or a simple green salad.
Pro Tips For Making Stouffer'S Macaroni And Cheese
- Cook pasta AL DENTE: DESCRIPTION: Stouffer’s calls for fully cooked noodles, but I’ve found that elbow macaroni straight from the pot—still with a tiny bite—holds up better when mixed with the cheese sauce. Drain, rinse briefly, and toss in a splash of pasta water (about ¼ cup) before adding to the sauce. This keeps the texture creamy, not gummy.
- Grate cheese FINE: DESCRIPTION: Sharp cheddar loses its punch when it clumps. Use the smallest holes on your box grater—or pulse pre-shredded cheese in a food processor for 10 seconds—to mimic the texture of Stouffer’s velvety sauce. Lumpy cheese = sad, grainy bites.
- Melt butter LOW: DESCRIPTION: I used to rush the roux, and the flour would burn before the cheese melted. For this recipe, melt the butter over medium-low heat, then whisk in the flour constantly for 2 full minutes before adding milk. The sauce should bubble gently, not brown—this is where the magic happens.
- Stir sauce CONSTANTLY: DESCRIPTION: The moment you stop whisking after adding cheese is when lumps form. Keep stirring for at least 3 minutes after the cheese disappears—yes, even if it looks smooth. I learned this the hard way when my first batch separated into cheese curds and sad, thin sauce.
Dietary considerations for this recipe
Gluten-Free Swap
For a gluten-free version, swap the elbow macaroni for gluten-free pasta like Barilla's GF penne or Jovial's brown rice elbow noodles. The sauce stays the same, but use gluten-free panko (like Schär or Bob's Red Mill) for the crispy crown.
I've tested this with my daughter Lily—she loves the texture, though the gluten-free breadcrumbs toast slightly faster, so watch them closely. 🌾
Dairy-Free Options
Replace the milk with unsweetened almond milk or coconut milk for a dairy-free base, but reduce to 1.5 cups since plant milks are thinner. Use vegan cheese shreds like Daiya or Violife, and add 1 tbsp nutritional yeast for that cheesy depth.
The sauce will be lighter but still creamy. For the breadcrumb crown, skip the parmesan and add 1 tbsp olive oil to the panko mix for extra richness. 🧀
Lower-Carb Adaptation
Cut the carbs by using cauliflower rice> instead of pasta—sauté it first with 1 tbsp butter until tender. For the sauce, reduce the milk to 1 cup> and add ½ cup heavy cream> for extra richness.
Top with a crispy bacon crumble> (cook 4 slices> until crispy and crumble) instead of breadcrumbs. This version is keto-friendly and still packed with flavor. 🥓
Nut-Free Allergies
If nut allergies are a concern, stick with the original recipe but ensure all ingredients are certified nut-free. For the breadcrumb crown, use crushed cornflakes> (like Kellogg's) instead of panko. They toast up nicely and provide the same crunch.
Always check labels on cheese and milk to confirm they're processed in nut-free facilities. Safety first—especially when feeding little ones like Lily! 🛡️
Vegan Protein Boost
Add ½ cup cooked lentils> or crumbled tofu> to the pasta mixture for extra protein. For the sauce, blend ½ cup silken tofu> with the milk before adding to the roux for a creamier texture.
Use vegan butter> (like Earth Balance) and ensure all cheese substitutes are labeled dairy-free. The result is hearty, satisfying, and packed with plant-based protein. 🌱
Nutrition facts
Frequently asked questions
Can I make this macaroni and cheese ahead of time?
Assemble the dish completely (including the breadcrumb topping) and refrigerate for up to 24 hours before baking. When ready to bake, simply add 5-10 extra minutes to the baking time. For best results, bake straight from the fridge to ensure even cooking and that perfect crispy crown.
Why did my breadcrumb topping turn soggy?
Soggy breadcrumbs usually happen when the cheese sauce is too wet or the breadcrumbs weren't pressed firmly enough. Make sure to drain the pasta well and press the breadcrumb mixture gently but firmly into the cheese. For extra insurance, broil for 1-2 minutes at the end of baking to crisp it up again.
What's the best way to reheat leftovers?
Leftovers reheat beautifully! Cover with foil and bake at 350°F for 10-15 minutes until warmed through. For extra crispiness, uncover for the last 2 minutes of reheating. Microwave reheating works too, but expect the breadcrumb topping to lose some crunch—cover with a damp paper towel for 30 seconds to restore moisture balance.
Can I use a different type of pasta?
While elbow macaroni is traditional, you can experiment with other short pasta shapes like cavatappi or shells. For longer pasta like penne, cut it into 1-inch pieces first to ensure even cooking. Just remember to adjust cooking times slightly—smaller shapes may need 1-2 minutes less in the oven.
How do I make this recipe kid-friendly?
Kids love this dish! Let them help press the breadcrumbs into the cheese for fun. For picky eaters, serve with a side of steamed broccoli or carrot sticks. You can also cut the baked mac and cheese into fun shapes using cookie cutters before serving. The crispy topping is always a hit with little ones—just watch them grab for it before the cheese cools!