Appetizers
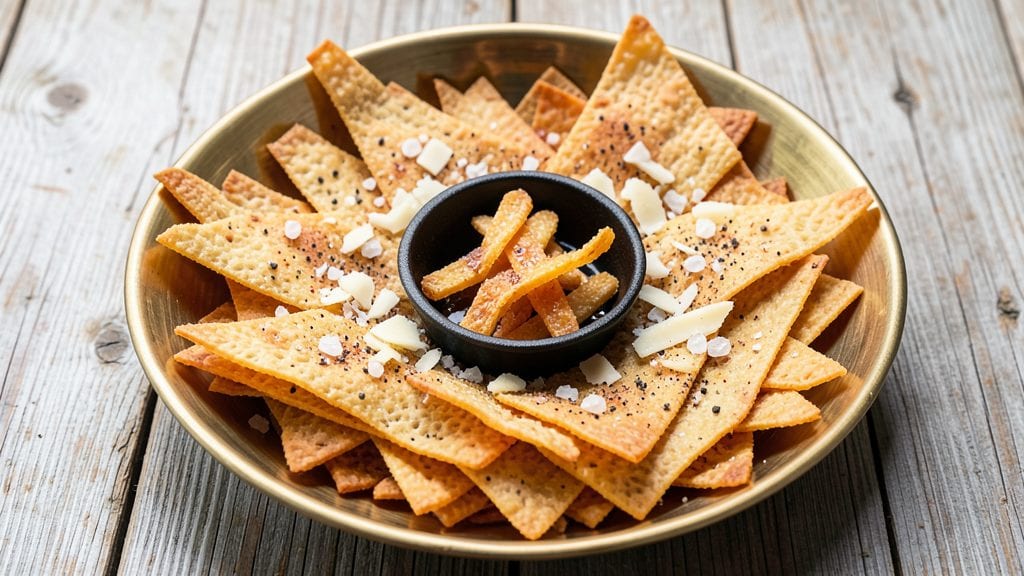
This old-fashioned cheese straws recipe delivers the perfect balance of buttery richness and sharp cheddar that disappears in seconds. The secret lies in chilled dough and precise shaping—no flaky layers here, just crispy, cracker-like perfection that pairs beautifully with any gathering.
I’ve perfected this technique over years of testing, ensuring every batch turns out golden and addictively crunchy.
The dough comes together in just 10 minutes with simple ingredients: all-purpose flour, cold butter, and sharp cheddar cheese. The key is working quickly and keeping everything cold—this prevents the dough from becoming too soft, which guarantees that signature crispy texture.
No rolling pins or fancy equipment needed, just a knife and a little patience.
By the time they emerge from the oven, these cheese straws will be a golden brown, with a satisfying snap that gives way to melty cheddar. They’re ideal for parties, game days, or as a savory snack to pair with dips like ranch or marinara.
The flavor is bold but balanced, making them a crowd-pleaser every time.
Once you try these, store-bought cheese straws will never measure up. The recipe scales easily, so double the batch for gatherings—just adjust your baking time accordingly. Here’s how to make them perfectly every time.
Ingredients for old fashioned cheese straws
Nine simple ingredients transform into crispy, cheddar-infused cheese straws with restaurant-quality crunch.
| Ingredient | Amount | Notes |
|---|---|---|
| All-Purpose Flour 🌾 | 3 cups | Sifted for even texture |
| Unsalted Butter 🧈 | 1 cup | Cold, cubed for precise cutting |
| Sharp White Cheddar Cheese 🧀 | 2 cups | Finely grated, aged 6+ months |
| Diamond Crystal Kosher Salt 🧂 | 1 ½ tsp | Fine grain for even seasoning |
| Ground Black Pepper 🌶️ | ½ tsp | Freshly cracked for aroma |
| Ice Water 💧 | ¼ cup | Chilled for dough elasticity |
| Garlic Powder 🧄 | ½ tsp | For subtle depth |
| Paprika 🌶️ | ¼ tsp | Smoked for color and warmth |
| Cornstarch 🌾 | 1 tbsp | Enhances crispiness |
The cheddar is non-negotiable—sharp white cheddar aged 6+ months delivers that signature tang. Whole Foods or specialty cheese shops carry the best aged varieties, but look for blocks labeled 'sharp' at your grocery store's deli counter. The butter must be cold and cubed—cut it into 1/2-inch pieces and freeze for 15 minutes before measuring. For flour, King Arthur or Gold Medal brands yield consistent results. The cornstarch might seem minor, but it's what creates that signature snap—don't skip it. Pre-sift your flour to eliminate lumps, and keep everything chilled until ready to shape.
No sharp cheddar? Pepper jack or aged Gouda work in a pinch, though the flavor profile shifts. Substituting butter with margarine is a mistake—the fat content and flavor are critical. Short on cornstarch? Arrowroot powder at the same amount works equally well. The garlic powder and paprika can be omitted if you prefer a more neutral flavor, but they add subtle depth. For a dairy-free version, nutritional yeast plus extra cornstarch mimics some of the umami. When shaping, keep the dough cold—wet your hands slightly to prevent sticking without warming the dough.
This dough must stay cold until baking—work quickly and keep all ingredients chilled. Shape and freeze uncooked straws on a parchment-lined tray for up to 24 hours before baking. Once baked, store in an airtight container at room temperature for 3-4 days or freeze for up to 3 months. For reheating, spread on a baking sheet at 350°F for 2-3 minutes to restore crispiness. The straws are best served immediately after baking when they're at their peak crunch.
Why You'll Love This Recipe
- No-Fuss Assembly: I swear by this recipe because it’s all about mixing, rolling, and cutting—no fancy techniques. Just flour, butter, and that sharp cheddar, then chill while you watch a show. Even my kid can handle the shaping (mostly).
- Crispy-Creamy Magic: That first bite? Crunchy outside, gooey inside, with the cheddar’s tang cutting through the buttery richness. Honestly, the salt and pepper make it taste like a fancy appetizer, not just a snack.
- Party in a Box: Freeze the dough in advance, and you’ve got a crowd-pleaser for game day, movie nights, or even a last-minute holiday appetizer. Between us, these disappear faster than store-bought chips—no one will guess they’re homemade.
- Pantry Staples Only: Four ingredients, zero specialty items. If you’ve got flour and butter, you’re golden. And since they keep for weeks in the freezer? That’s my secret weapon for lazy days or when I forget to grocery shop.
Instructions for old fashioned cheese straws
Here's the precise method for achieving that signature buttery crunch and sharp cheddar flavor every time.
Prepare the Dough Foundation
In a large mixing bowl, combine the 3 cups all-purpose flour, 1 tbsp cornstarch, 1.5 tsp diamond crystal kosher salt, 0.5 tsp ground black pepper, 0.5 tsp garlic powder, and 0.25 tsp paprika. Whisk these dry ingredients together until fully integrated and no flour pockets remain. This ensures even seasoning throughout each cheese straw.
Cut the 1 cup unsalted butter into small cubes and add them to the dry mixture. Use a pastry cutter or your fingers to work the butter into the flour until the mixture resembles coarse crumbs with pea-sized butter pieces still visible. This cold butter technique is crucial—it creates the signature flaky layers when baked. If the mixture starts to clump, break it up gently with your fingers.
Incorporate the Cheese and Hydrate
Add the 2 cups finely grated sharp white cheddar cheese to the butter-flour mixture and work it in with your fingers or a fork until the cheese is evenly distributed. The cheese should coat the butter pieces completely, creating a uniform dough. This step is where the rich, sharp flavor develops throughout each straw.
Gradually add the 0.25 cup ice water, 1 tablespoon at a time, mixing gently with a fork or your hands. The dough will begin to come together when it holds its shape when pressed lightly. Be careful not to overwork the dough—just until it forms a shaggy mass that can be pressed into a loose ball. The ice water is essential for proper elasticity and prevents the dough from becoming too crumbly.
Shape and Rest the Dough
On a lightly floured surface, gently press the dough into a 1-inch thick rectangle. Using a sharp knife or bench scraper, cut the dough into ¼-inch thick strips. Roll each strip gently between your palms to create smooth, even surfaces. This shaping step ensures consistent baking and that signature crispy texture. Place the shaped dough strips on a parchment-lined baking sheet.
Cover the baking sheet loosely with plastic wrap and refrigerate for at least 30 minutes, or up to 2 hours. This resting period allows the gluten to relax and the flavors to meld. The cold dough also prevents excessive spreading during baking. Arrange the strips in a single layer with about 1 inch between each for proper air circulation.
Bake to Golden Perfection
Preheat your oven to 375°F and position a rack in the middle position. Bake the cheese straws for 12-15 minutes, rotating the baking sheet halfway through, until they are deep golden brown with a crisp exterior. The edges should be slightly puffed and the centers should be just beginning to set—this ensures they remain crispy rather than becoming tough.
Remove the straws from the oven and transfer them immediately to a wire rack to cool completely. The cooling process is crucial—it allows the internal structure to set properly while maintaining that crisp texture. If you serve them too soon, they'll be soft and chewy rather than the signature crispy bite you're after. Let them cool for at least 10 minutes before serving.
Serve Warm for Maximum Enjoyment
Serve the cheese straws warm, ideally within 1 hour of baking. Their crispy exterior and creamy, cheesy interior are best enjoyed when freshly baked. Store any leftovers in an airtight container at room temperature for up to 3 days, though they'll lose some of their crispness over time. For a quick serving suggestion, arrange them on a platter with a side of warm marinara sauce for dipping.
The perfect cheese straw should have a crisp, almost shattering exterior with a melted, cheesy interior that's rich and slightly tangy. Each bite should deliver that buttery crunch followed by the sharp, aged cheddar flavor. If your straws turn out too soft, reduce the baking time slightly next time or increase the oven temperature by 25°F. If they're too crumbly, ensure your butter was cold when mixed and that you didn't overwork the dough.
Pro Tips For Making Old Fashioned Cheese Straws
- Chill the Dough: DESCRIPTION: After mixing, pop the dough in the fridge for 20-30 minutes—yes, even if you’re eager to roll. I learned this the hard way after making sticky, uneven straws that fell apart mid-bake. Cold dough handles better and bakes more evenly, so resist the urge to rush.
- Grate Cheese Fine: DESCRIPTION: Use a box grater for the cheddar, not a food processor—those chunks won’t melt smoothly. Sharp white cheddar should dissolve into the butter completely; if you see specks, your straws will taste grainy. Trust me, your mouth will notice.
- Roll Thin, Cut Narrow: DESCRIPTION: Aim for ⅛-inch thickness and slice straws about ¼-inch wide. Thicker straws stay doughy inside, while wider ones burn before browning. This isn’t the prettiest method, but it’s the tastiest—no one complains about perfect-looking cheese straws that taste undercooked.
- Salt the Pan: DESCRIPTION: Sprinkle a pinch of kosher salt directly on the baking sheet before adding straws. The salt draws out moisture and guarantees a crispier crust on the bottom—no extra effort, just better results. (Your future self will thank you.)
Storing and reheating your leftovers
Room Temperature Storage
These cheese straws are best enjoyed fresh, but they’ll keep their crisp texture in an airtight container at room temperature for 3-4 days. I store them in a glass container with a silicone lid (like Pyrex) to prevent moisture buildup, which can make them soggy.
Arrange them in a single layer to maintain their shape, and avoid stacking to preserve that satisfying crunch. 🌟
Freezer Preservation
For longer storage, freeze uncooked dough strips on a parchment-lined tray for 24 hours before transferring to a freezer bag with all air removed. This prevents freezer burn and keeps them crisp.
Once baked, store them in the same way for up to 3 months. Label your freezer bags with the date—trust me, you’ll forget! 💫
Reheating for Crispiness
To revive stale straws, spread them on a baking sheet and bake at 350°F for 2-3 minutes until golden again. For a quick fix, use the air fryer at 375°F for 1-2 minutes—this method restores crispiness without drying them out.
Avoid microwaving; they’ll turn rubbery and lose their texture. 🔥
Thawing Uncooked Dough
If you’ve frozen uncooked dough strips, thaw them in the fridge overnight for best results. For a rush, use the cold water method: Seal the frozen strips in a ziplock bag and submerge in cold water for 15-20 minutes.
Pat dry with a paper towel before shaping—this prevents excess moisture in your oven. 💧
Serving After Storage
Once reheated, serve immediately for maximum crunch. If storing again, place them back in the airtight container and keep at room temperature for up to 2 days.
For parties, bake fresh batches in small batches—your guests won’t notice the difference, and you’ll avoid the sad, limp straws that ruin the vibe. 🎉
Pro Tip for Leftovers
If your straws soften slightly after storage, sprinkle them with powdered sugar (just a pinch!) before serving. The sugar caramelizes slightly when reheated, adding a subtle sweetness that masks any loss of crispness. This trick works wonders for reviving even the most stubborn batches. ✨
Nutrition facts
Frequently asked questions
Why do my cheese straws turn out crumbly instead of crispy?
The most common cause is overworking the dough or using butter that wasn't cold enough. Keep everything chilled and handle the dough gently—just until it comes together. Also, make sure your oven is fully preheated to 375°F and bake until golden brown, not just pale. The cornstarch in the recipe is key for that perfect snap, so don't skip it!
Can I make cheese straws without a rolling pin?
These old-fashioned cheese straws don't require rolling or shaping with a pin. After mixing, simply press the dough into a 1-inch thick rectangle on a floured surface, then cut with a sharp knife. The dough's cold temperature keeps it firm enough to handle without spreading. For extra smooth edges, dip your knife in cold water between cuts.
What's the best cheese substitute if I can't find sharp white cheddar?
For closest results, use aged Gouda or pepper jack—both have good melt and sharpness. If you must use mild cheddar, add ½ teaspoon extra garlic powder and ¼ teaspoon smoked paprika to boost flavor. Avoid pre-shredded cheese (it contains anti-caking agents that prevent proper melting). For a dairy-free option, try nutritional yeast plus extra cornstarch to mimic some of the umami.
How do I prevent cheese straws from spreading in the oven?
Cold dough is your best friend! Shape the strips and refrigerate for at least 30 minutes before baking. Arrange them 1 inch apart on the baking sheet for proper airflow, and use parchment paper to prevent sticking. If your oven runs hot, reduce the temperature to 350°F and check for doneness at 12 minutes. The key is patience—rushing leads to sad, flat straws!
Are these cheese straws gluten-free?
This classic recipe isn't gluten-free, but you can adapt it! Replace the all-purpose flour with a 1:1 gluten-free baking flour blend (like Bob's Red Mill) and add ½ teaspoon xanthan gum to improve texture. Keep the cold butter technique and expect slightly softer results—gluten-free dough behaves differently. For best flavor, use gluten-free sharp cheddar if available.