Breakfast & Brunch
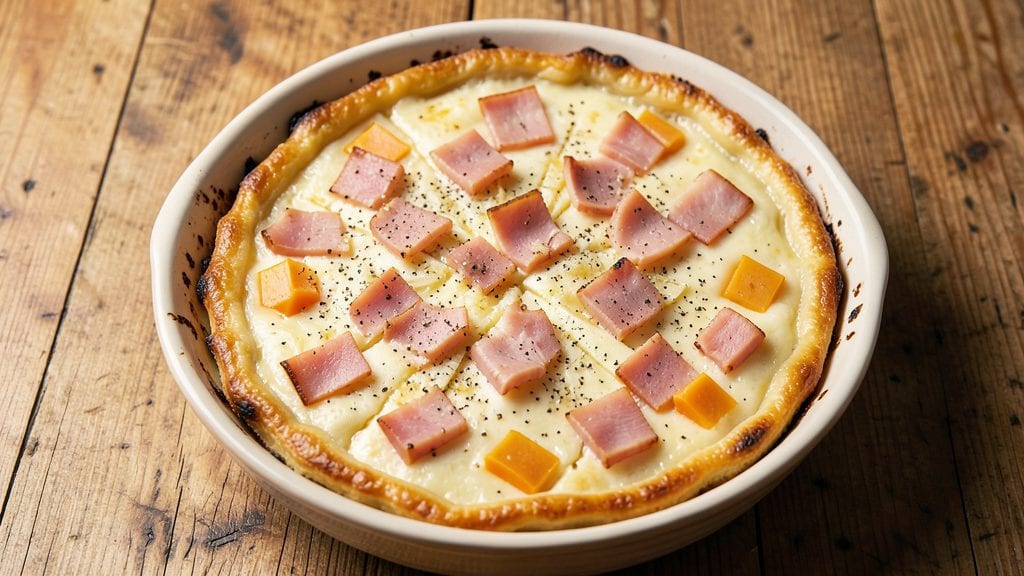
This no-crust ham and cheese quiche recipe delivers all the savory satisfaction of a classic quiche without the fuss of pie dough. The secret lies in a simple egg custard base that bakes up golden and fluffy, holding tender ham and sharp cheddar in perfect harmony.
I developed this version after burning through three different crust attempts—each one either too dense or too crumbly to hold up to the custard’s weight.
The beauty of this approach is its simplicity: no rolling, no chilling, no pie pans—just eggs, dairy, and your choice of ham and cheese. The custard develops a delicate, almost silky texture while maintaining structure, making it ideal for breakfast or brunch without sacrificing restaurant-quality results.
Baking at a steady 350°F ensures even cooking and a golden top every time.
What you’ll end up with is a quiche that’s crisp at the edges and tender in the center, with pockets of melted cheese and savory ham throughout. The lack of crust doesn’t mean sacrificing flavor—instead, it allows the egg and cheese to shine.
This version is also infinitely customizable, whether you prefer sharp cheddar, Gruyère, or a mix of both.
Serve warm with a side of fresh greens or crusty bread, and you’ll have a meal that’s quick to prepare but feels like a special occasion. Ready to try a quiche that’s foolproof and delicious? Let’s get started.
Ingredients for no crust ham and cheese quiche
Four eggs, two cheeses, and ham—just the essentials for a foolproof quiche.
| Ingredient | Amount | Notes |
|---|---|---|
| Large Eggs 🥚 | 4 whole | Room temperature for best mixing |
| Heavy Cream 🥛 | ½ cup | Full-fat for creaminess |
| Whole Milk 🥛 | ½ cup | Warmed slightly for smooth custard |
| Sharp Cheddar Cheese 🧀 | 1 cup | Freshly grated, block preferred |
| Gruyère Cheese 🧀 | ½ cup | Optional but adds nutty depth |
| Diced Ham 🥓 | 1 cup | Low-sodium preferred |
| Salt 🧂 | ½ tsp | Kosher or sea salt |
| Black Pepper 🌶️ | ¼ tsp | Freshly ground preferred |
| Nutmeg 🌿 | ⅛ tsp | Freshly grated for warmth |
| Unsalted Butter 🧈 | 2 tbsp | Melted for greasing the pan |
| All-Purpose Flour 🌾 | 1 tbsp | For dusting the pan |
The cheeses are where the magic happens. Sharp cheddar gives that classic tang, but I always add Gruyère for a nutty depth—it’s worth the extra few bucks at Whole Foods or a specialty cheese shop. If you can’t find Gruyère, Parmesan works too. The ham? Low-sodium is key—otherwise, you’ll end up with a salty quiche. I grab mine pre-diced from the deli section to save time, but fresh-cut works just as well. For the eggs, room temperature makes mixing easier—just pull them out 10 minutes before you start.
No heavy cream? Half-and-half or whole milk will work, though the texture might be slightly lighter. Short on Gruyère? Add another 0.25 cup of cheddar—it’ll still taste amazing. The nutmeg is non-negotiable here; it’s what gives that classic quiche flavor. If you don’t have it, a pinch of cinnamon can mimic it in a pinch. For the custard, warming the milk slightly (just until it’s cozy to the touch) helps it blend smoothly with the eggs. And if you’re worried about curdling, whisk the eggs and milk together gently—no blender needed.
This quiche reheats beautifully—honestly, it’s even better the next day once the custard sets. Store leftovers in the fridge for up to 4 days, covered tightly. To serve, I like to run it under the broiler for 2-3 minutes to get that golden, bubbly top again. For meal prep, portion it into individual slices and freeze between parchment paper for up to 3 months. Just thaw overnight in the fridge before reheating—no microwaving, or you’ll end up with a sad, rubbery mess.
Why You'll Love This Recipe
- No Prep Nightmare: Honestly, I just dump everything into a pie dish—no rolling dough, no waiting for it to chill. The ham and cheeses go in raw, then the custard pours over like a dream, and boom, 20 minutes later, you’ve got dinner.
- Cheese Pull Factor: That sharp cheddar and Gruyère combo? It’s the kind of salty, melty magic that makes you close your eyes. The custard soaks up the flavor while keeping the center rich and creamy—no dry bites here, just pure satisfaction.
- Leftovers? Yes, Please: Between us, this recipe makes enough for two lunches without trying. I swear, the next day’s slices taste even better—like the cheeses had time to marry properly. Pack it for work or freeze it; it’s that reliable.
- Budget Breakfast Boost: I use whatever ham’s on sale, and the cheeses stretch further than you’d think. The eggs and cream are the stars, but they’re pantry staples that don’t break the bank. Feeds four for under $10, and no one complains.
Step-by-step instructions for no-crust ham and cheese quiche
Here's how to make a rich, golden custard quiche without any crust hassle.
Prepare the Cheese and Ham Filling
In a medium bowl, combine the 1 cup diced ham and 1 cup sharp cheddar cheese. Add the 0.5 cup gruyère cheese, breaking it into small chunks for even distribution. Sprinkle with 0.25 tsp black pepper and 0.125 tsp nutmeg, then gently toss everything together with your hands until evenly coated. This step ensures every bite gets that perfect mix of salty ham, sharp cheddar, and nutty gruyère.
Set the mixture aside while you prepare the custard base. The cheese will soften slightly as it sits, creating a creamy texture when baked. If you're using pre-shredded cheese, give it a quick pulse in a food processor to break up any clumps—this prevents a grainy texture in your finished quiche.
Whisk the Egg Mixture to Perfection
In a separate large bowl, whisk together the 4 whole large eggs until they're completely combined. Add the 0.5 cup heavy cream and 0.5 cup whole milk, whisking vigorously for 30 seconds until smooth. The mixture should look pale yellow and slightly frothy.
Next, add 0.5 tsp salt and whisk again for another 15 seconds. This step is crucial for balancing flavors—too little salt makes the quiche bland, while too much overpowers the delicate custard. The warm milk helps create a silky texture, so if your milk isn't warmed, let it sit in a bowl of hot water for 2 minutes before using.
Prep the Baking Dish
Preheat your oven to 350°F. Lightly grease a 9-inch pie dish or oven-safe skillet with 1 tbsp melted unsalted butter, then sprinkle the bottom evenly with 1 tbsp all-purpose flour. Tilt the dish and rotate it to coat the entire bottom—this prevents sticking and creates a subtle crispness at the base.
Spread the cheese and ham mixture evenly across the bottom of the prepared dish, pressing down gently with the back of a spoon. You want it to form a ¼-inch thick layer—this ensures the custard cooks evenly and doesn't get watery. The filling should cover the entire bottom without piling up in the center.
Pour and Bake the Custard
Slowly pour the egg mixture over the cheese filling, using a spatula to spread it evenly. Tap the dish gently on the counter a few times to help the mixture settle and eliminate any air bubbles. Place the dish on a baking sheet to catch any potential overflow.
Bake for 35-40 minutes until the custard is set and the top is golden brown with just a slight wobble in the center (it should still feel slightly jiggly—this indicates perfect doneness). The edges should be fully set while the center remains custardy. If the top browns too quickly, loosely tent it with aluminum foil after 20 minutes to prevent over-browning.
Rest and Serve Warm
Remove the quiche from the oven and let it rest for 10-15 minutes before slicing. This resting period allows the custard to fully set and the flavors to meld together. You'll notice the center firms up slightly as it cools, but it should still be creamy—not rubbery.
Slice into wedges and serve warm for the best texture. The cheese should be melted but not stringy, the ham should be tender, and the custard should be rich and velvety. If you prefer a firmer texture, you can chill the quiche for 1 hour before serving, but it's best enjoyed warm straight from the oven.
Pro Tips For Making No Crust Ham And Cheese Quiche
- Preheat That Pan: I learned this the hard way—skipping the preheat means your quiche’s bottom will turn into a sad, rubbery mess instead of a golden, custardy base. Get your oven to 350°F (175°C) and let the pan sit for at least 10 minutes before pouring in the mixture. No excuses.
- Shred Cheese Like a Pro: Buy pre-shredded cheese? Skip it—it’s coated with anti-caking agents that make your quiche taste like plastic. Instead, shred your own sharp cheddar and Gruyère using a box grater, then toss the cheese in a bowl with a splash of milk (about 1 tablespoon per cup). This keeps it from clumping and ensures it melts smoothly into the custard.
- Whisk Eggs Until Silky: After burning three batches of quiche with lumpy custard, I finally understood: whisk those eggs thoroughly. Beat the eggs, heavy cream, and milk together until the mixture is uniform and just slightly thicker than heavy cream—no streaks, no chunks. This guarantees a silky texture, not a broken one.
- Bake Low and Slow: Sounds weird, but it works: resist the urge to crank the heat. Bake your no-crust quiche at 325°F (160°C) instead of 350°F for the first 20 minutes. This gives the custard time to set evenly without curdling on top, while the last 10-15 minutes at 350°F will give it that perfect golden finish. Trust the process—your future self will thank you.
Essential equipment for this recipe
Oven Essentials
Your oven is the heart of this quiche, so I recommend using a 9-inch pie dish or oven-safe skillet made of ceramic or cast iron—both distribute heat evenly.
I’ve had the best results with a Le Creuset stoneware pie dish because it retains heat perfectly, ensuring the custard sets evenly. If you don’t have one, a standard metal pie dish works fine, just avoid non-stick pans—they can cause the custard to stick even with butter and flour.
Preheat your oven to 350°F and let it stabilize for 10-15 minutes before baking. 🌡️
Mixing Tools
A whisk is non-negotiable for the egg mixture—it prevents lumps and creates a silky texture. I use a stainless steel whisk (like the OXO Good Grips) because it’s durable and handles dairy well.
For the cheese and ham filling, a medium bowl and your hands work best for even distribution. If you’re sensitive to texture, wear latex-free gloves—some cheeses can be sticky! A spatula (preferably heat-resistant silicone) helps spread the custard smoothly without tearing.
Measuring Precision
Accurate measurements make all the difference in custard texture. Use a digital kitchen scale for cheeses (like the OXO Good Grips) to ensure consistency—1 cup of grated cheddar can vary wildly by brand. For liquids, a liquid measuring cup with clear markings is essential.
I also keep a small mixing bowl (about 2-cup capacity) for warming the milk—just place it in a bowl of hot water for 2 minutes to reach the perfect temperature. A fine-mesh strainer comes in handy if you’re using pre-shredded cheese to remove any clumps.
Optional Extras
For a golden finish, invest in a parchment paper circle that fits your pie dish—it prevents sticking and makes cleanup effortless. A pastry brush (like the Norpro) helps distribute melted butter evenly on the dish.
If you love garnishes, a small bowl for holding fresh herbs (like chives or parsley) or hot sauce keeps everything within reach while plating. For meal prep, plastic wrap or aluminum foil is key for storing leftovers without drying out the custard. ✨
Temperature Control
A thermometer (like the Thermoworks Smoke) ensures your oven stays at 350°F—fluctuations can cause uneven cooking. If your oven runs hot, reduce the temperature to 340°F and add 5 extra minutes to the baking time.
For a crispier edge, I sometimes place the quiche on a baking sheet lined with parchment paper to catch any drips. A timer (even your phone works) is critical—overbaking turns custard rubbery, so keep an eye on it after 30 minutes.
Nutrition facts
Frequently asked questions
Why does my no-crust quiche turn out watery?
The most common cause is undercooked custard or too much liquid in the egg mixture. Always bake at 350°F for 35-40 minutes until the center has just a slight wobble. For extra insurance, whisk the eggs and milk vigorously for 30 seconds to create air pockets that help set the custard. If your quiche still seems watery, try adding 1 extra tablespoon of flour to the butter mixture when prepping the pan.
Can I make this quiche ahead of time?
This quiche actually tastes better the next day as the custard firms up. Store leftovers in an airtight container in the fridge for up to 4 days. To reheat, cover with foil and warm at 300°F for 10-15 minutes or use the broiler for 2-3 minutes to restore that golden top. For freezing, slice and wrap individual portions tightly in plastic wrap, then place in a freezer bag for up to 3 months. Thaw overnight in the fridge before reheating.
What's the best cheese substitute if I don't have Gruyère?
Gruyère adds nutty depth, but you can substitute with equal parts Parmesan or Swiss cheese for a similar flavor profile. For a sharper taste, add 0.25 cup extra cheddar. If you prefer milder cheese, mozzarella works but won't have the same rich flavor. The key is to use freshly grated cheese (block cheese is best) to avoid a grainy texture. Pre-shredded cheese often contains anti-caking agents that make the quiche less creamy.
Can I make this quiche in a different sized pan?
Yes, but adjust the baking time accordingly. For a 7-inch pan, bake for 25-30 minutes (the smaller surface area cooks faster), while a 10-inch pan may need 40-45 minutes. The custard should always have a slight wobble in the center when done. If using a non-standard pan, check doneness at 30 minutes—the edges will set first while the center remains custardy. For even cooking, place the pan on a baking sheet to catch any overflow.
How do I fix a quiche that's too salty?
If you've oversalted the custard, try adding 1 tablespoon of sugar or 1 teaspoon of honey to the egg mixture before baking—it helps balance the saltiness. For a more dramatic fix, you can top the baked quiche with a thin layer of sour cream or Greek yogurt before serving, which adds creaminess and slightly dilutes the salt. If the ham is the issue, opt for low-sodium ham next time or rinse pre-packaged ham under cold water to reduce sodium content.