Appetizers
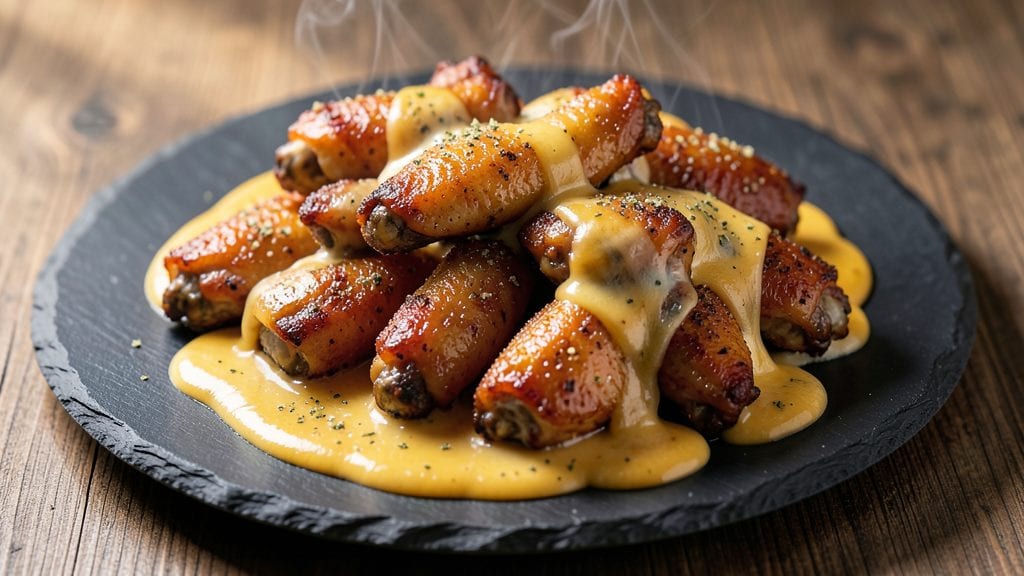
This cheese wings recipe delivers the perfect balance of crispy baked wings and that irresistible stretchy cheese pull that makes every bite worth it.
After years of perfecting the technique, I've cracked the code for achieving golden, crunchy wings that hold up under a generous layer of melted cheese without turning soggy.
The secret lies in baking the wings to just the right crispiness before adding the cheese, ensuring each bite has that satisfying texture contrast.
What sets these cheese wings apart is the foolproof method for creating that signature cheese pull—using a blend of sharp cheddar and mozzarella that melts into a smooth, elastic blanket over the wings.
This recipe requires just 10 ingredients and 45 minutes of active time, making it ideal for game day gatherings or a satisfying snack night in.
The wings bake until crispy on the outside while staying tender inside, then finish under the broiler with the cheese topping for that perfect golden-brown crust.
By the time you're done, you'll have a platter of crispy wings with that legendary cheese pull that stretches dramatically with every bite. The aroma of baking wings fills your kitchen, while the melted cheese creates a gooey, satisfying texture that's impossible to resist.
This is the kind of appetizer that disappears faster than you can say "playoffs," but every bite is worth it.
Serve these cheese wings with classic ranch or blue cheese dressing for dipping, and prepare for rave reviews from anyone who tries them. The recipe scales easily for crowds, and leftovers reheat beautifully in the oven.
Let's get started on making these crowd-pleasing wings that will have everyone asking for seconds.
Ingredients for cheese wings
Ten simple ingredients create wings with perfect crispy texture and legendary stretchy cheese pull.
| Ingredient | Amount | Notes |
|---|---|---|
| Chicken Wings 🍗 | 2 lb | Drumettes and flats preferred, skin-on |
| All-Purpose Flour 🌾 | 1 cup | For dredging, unsifted |
| Sharp Cheddar Cheese 🧀 | 1 ½ cups | Shredded, 2-year aged preferred |
| Mozzarella Cheese 🧀 | 1 cup | Shredded, low-moisture preferred |
| Butter 🧈 | ½ cup | Unsalted, melted |
| Garlic Powder 🧄 | 1 tbsp | Freshly ground preferred |
| Paprika 🌶️ | 1 tbsp | Smoked variety for depth |
| Ground Black Pepper 🌶️ | ½ tsp | Freshly cracked |
| Kosher Salt 🧂 | 1 ½ tsp | For seasoning |
| Olive Oil 🫒 | 2 tbsp | For tossing wings |
The chicken wings are the foundation, so quality matters. Look for drumettes and flats at your local butcher or grocery store's meat department—they're more flavorful than the tips. Costco or Whole Foods often have excellent selections, but any reputable supermarket will do. Pat them dry before baking to ensure crispiness. The skin-on variety adds extra flavor, but boneless wings work too if you're short on time. For a crowd, double the amount—these disappear fast during game day.
No sharp cheddar? Substitute pepper jack or white cheddar for a slightly different flavor profile, but stick with aged cheddar for that signature tang. The mozzarella can be pre-shredded (though it has anti-caking agents), but grating your own from a block gives the best melt. Running low on butter? Melted cream cheese works in a pinch, though it's slightly heavier. The spices are flexible—swap smoked paprika for regular if you prefer a milder taste. For extra crispiness, toss the wings in cornstarch instead of flour before baking.
Prep ahead for convenience: Shred and store cheese separately in airtight containers for up to 5 days. The wings themselves keep 2 days in the fridge before baking. For make-ahead dinners, bake the wings without cheese, then reheat under the broiler with fresh cheese. These reheat beautifully—just 5 minutes at 375°F brings back that crispy texture. Portion into individual serving bags for easy snacking or game day serving.
Why You'll Love This Recipe
- No-Fuss Assembly: I swear, this takes less effort than ordering takeout. Just flour, dip, and bake—no fancy techniques, no last-minute grocery runs. The wings come out golden and cheesy with barely any hands-on time.
- Melty Magic Combo: Sharp cheddar and mozzarella together? That’s the secret. The cheddar adds a sharp bite, while the mozzarella stretches into gooey perfection. Honestly, the first bite makes you question why you ever bought frozen cheese wings.
- Game for Any Gathering: Weeknight dinner? Party snack? Date night? This works for all of it. Serve with ranch or hot sauce, and suddenly you’ve got a crowd-pleaser that feels like a restaurant dish—without the fuss.
- Budget-Friendly Leftovers: Wings freeze like a dream, so I always make extra. A batch costs less than half of what you’d pay for delivery, and reheating them is just 10 minutes in the oven. My wallet—and my kids—thank me every time.
Instructions for crispy baked wings with stretchy cheese pull
Here's how to achieve perfectly crispy wings with that signature gooey cheese pull every time.
Prepare the Wings for Maximum Crispiness
Pat the 2 lb chicken wings completely dry with paper towels, making sure to remove all moisture from the skin and joints. This step is critical for crispy wings—the more water you remove, the better the crust will form. Separate the wings into drumettes and flats, leaving the skin intact if possible.
In a large bowl, toss the wings with 2 tbsp olive oil until evenly coated. This helps create a golden crust during baking. In a separate shallow dish, combine 1 cup all-purpose flour, 1 tbsp garlic powder, 1 tbsp paprika, 0.5 tsp ground black pepper, and 1.5 tsp kosher salt. Toss the oiled wings in this flour mixture until fully coated, pressing gently to adhere the seasoning.
Bake Until Golden and Crisp
Arrange the seasoned wings on two parchment-lined baking sheets in a single layer, leaving space between each piece. Bake at 425°F for 35-40 minutes, flipping halfway through at the 20-minute mark. You'll know they're ready when the skin is deep golden brown and crispy, and the internal temperature reaches 165°F.
Real talk: Don't skip the flip. The first side needs to get properly browned before you turn them, or you'll end up with uneven cooking. If the wings start browning too quickly, tent the baking sheets loosely with foil to prevent burning while they finish cooking.
Create the Cheese Sauce Mixture
While the wings bake, melt 0.5 cup butter in a microwave-safe bowl in 30-second intervals, stirring between each, until completely melted. In a separate bowl, combine the melted butter with 1.5 cups sharp cheddar cheese and 1 cup mozzarella cheese. Stir until smooth and fully melted, creating a thick, stretchy cheese sauce.
Here's the thing—using both cheddar and mozzarella creates the perfect balance. The cheddar provides sharp flavor, while the mozzarella gives that classic stretchy texture. If your cheese doesn't melt completely, warm the mixture slightly longer in the microwave, stirring constantly to prevent scorching.
Toss Wings in Cheese Sauce
Remove the baked wings from the oven and immediately transfer them to a large bowl. Pour the cheese sauce over the wings and toss gently but thoroughly to coat every piece completely. The heat from the wings will help the cheese cling perfectly, creating that signature pull when you eat them.
For maximum cheese pull, work quickly while the wings are still hot. If the cheese starts to thicken too much, microwave it in 10-second bursts while tossing the wings to maintain that perfect consistency. The wings should be fully coated with a glossy, stretchy cheese layer.
Broil for Final Cheese Pull
Return the cheese-coated wings to the baking sheets and place them under the broiler for 1-2 minutes. Watch closely—the cheese should bubble and begin to brown slightly, creating that irresistible pull when you bite in. The broiler adds that final crispy texture to the cheese while keeping the wings warm.
This final step transforms good wings into exceptional wings. If the cheese browns too quickly, move the tray slightly farther from the broiler element. Serve immediately while the cheese is still hot and stretchy, with extra sauce on the side for dipping.
Pro Tips For Making Cheese Wings
- Bake Wings Twice: First at 425°F (220°C) for 30 minutes—this renders fat and crisps the skin. Then lower to 350°F (175°C) for the cheese stage. I learned this the hard way when my first batch turned greasy and soggy midway.
- Shred Cheese Coarse: Use a box grater or pulse in a food processor—small, uneven shreds melt faster and stick better than store-bought pre-shredded cheese. My grandmother swore by this, and she was right: the texture makes all the difference.
- Skip the Crowding: Pile wings single-layer on the baking sheet at first. They’ll spread and crisp evenly, not steam into a sad, limp mess. I know, I know—it takes more space, but your future self will thank you.
- Butter the Flour: Mix 1 tablespoon cold butter into the flour before dredging. The fat in the butter creates a richer, crispier crust than plain flour alone. Sounds weird, but it works—trust the process.
Best sauces and condiments for cheese wings
Classic Ranch Dip
This timeless pairing transforms cheese wings into a full experience.
Whip up a batch of classic ranch dressing using 1 cup sour cream, ½ cup mayonnaise, 2 tbsp buttermilk, 1 tbsp fresh dill, 1 tsp garlic powder, ½ tsp onion powder, and ½ tsp kosher salt.
The cool, creamy texture contrasts beautifully with the hot, cheesy wings. I like to serve it in a small bowl for dipping, with extra dill sprinkled on top for freshness. 🥄
Spicy Buffalo Sauce
For those who crave heat, a tangy buffalo sauce elevates these wings to next-level deliciousness. Mix ½ cup hot sauce (like Frank's RedHot), 2 tbsp melted butter, and 1 tbsp honey for a sweet-spicy balance.
Toss the baked wings in this sauce before adding the cheese for a bold flavor punch. The sauce adds a glossy sheen and a kick that pairs perfectly with the creamy cheese. 🌶️
Blue Cheese Dressing
A bold blue cheese dressing adds a tangy, umami depth that cuts through the richness of the cheese.
Blend 1 cup crumbled blue cheese, ½ cup sour cream, 2 tbsp buttermilk, 1 tbsp chopped chives, 1 tsp Worcestershire sauce, and ½ tsp black pepper until smooth. Serve it on the side for dipping or drizzle it over the wings before serving.
The sharpness of the blue cheese makes every bite even more satisfying. 🧀
Honey Mustard Glaze
For a sweet and tangy twist, prepare a simple honey mustard glaze by combining 3 tbsp Dijon mustard, 2 tbsp honey, and 1 tbsp apple cider vinegar. Brush this glaze onto the wings after baking but before adding the cheese.
The glaze caramelizes slightly under the broiler, creating a sticky, flavorful crust that complements the melted cheese beautifully. This glaze works especially well if you're serving the wings as a main course. 🍯
Extra Cheese Sauce
Always keep a small bowl of extra cheese sauce on the side for dipping. Use the same blend of cheddar and mozzarella melted with butter, but thin it slightly with 1 tbsp milk or cream to make it easier to dip.
This lets guests customize their experience—some prefer the wings as-is, while others love to dunk them in the sauce for an extra cheesy bite. It’s a simple touch that makes the dish feel even more indulgent. 🧈
Pickled Vegetable Accompaniment
Balance the richness of the cheese wings with a crisp, tangy side of pickled vegetables. Quick-pickle ½ cup sliced red onions and ½ cup sliced jalapeños in 1 cup apple cider vinegar, 1 tbsp sugar, and 1 tsp salt for 30 minutes.
The bright acidity cuts through the fat, cleansing the palate between bites. Serve the pickles on a small plate alongside the wings for a refreshing contrast. 🥒
Nutrition facts
Frequently asked questions
Can I make cheese wings without frying?
This recipe uses a baking method that delivers crispy wings without frying. The key is baking at 425°F for 35-40 minutes and flipping halfway to ensure even browning. The result is golden, crispy wings with that signature cheese pull, all while keeping things healthier than traditional fried versions.
Why does my cheese sauce get grainy?
Grainy cheese happens when moisture content varies or the cheese isn't melted properly. Always use a 50/50 blend of sharp cheddar and mozzarella—the cheddar adds sharpness while mozzarella provides stretch. Melt the cheese slowly with butter in 30-second microwave bursts, stirring constantly, until completely smooth. If it still looks grainy, strain it through a fine-mesh sieve before tossing with wings.
How do I reheat leftover cheese wings?
Reheat in a 375°F oven for 5-7 minutes to restore crispiness. Place wings on a baking sheet lined with parchment paper and broil for 1-2 minutes at the end to re-melt the cheese. For microwave reheating, cover with a damp paper towel and heat in 20-second intervals, stirring between each, until warmed through. The oven method preserves texture best.
What's the best cheese for maximum stretch?
The perfect blend is sharp cheddar (75%) and low-moisture mozzarella (25%). The cheddar provides flavor and sharpness, while the mozzarella creates that iconic stretchy texture. Avoid pre-shredded cheese (it contains anti-caking agents that prevent proper melting). For extra gooeyness, add 1 tbsp cream cheese to the mix.
Can I make these wings ahead of time?
Yes! Prep the wings by baking them without cheese up to 2 days ahead, then store in an airtight container. When ready to serve, reheat in the oven at 375°F for 10 minutes, then add fresh cheese and broil for 1-2 minutes. For the cheese sauce, melt it fresh before serving to maintain that perfect stretchy consistency.