Appetizers
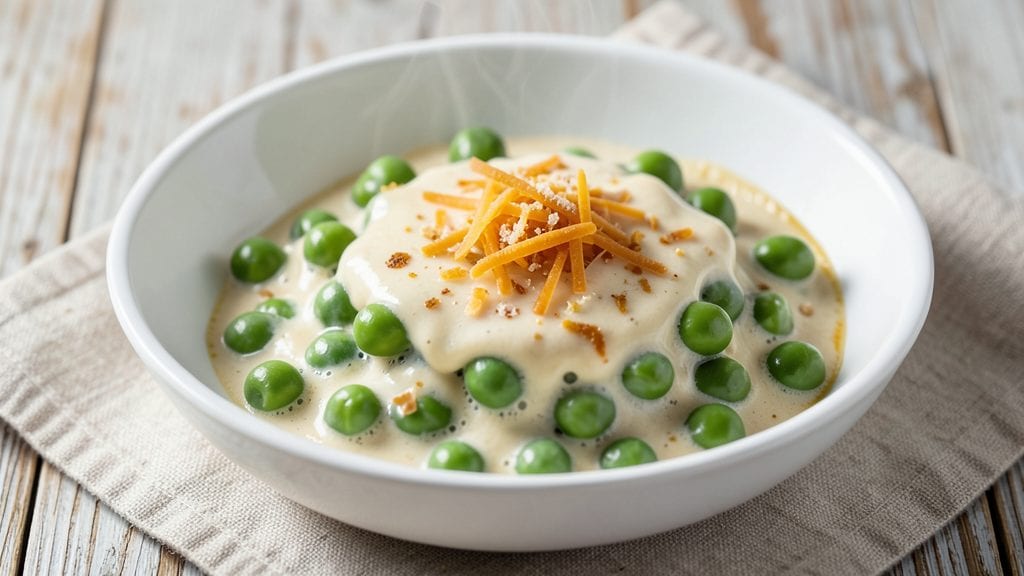
This cheese peas recipe transforms humble frozen peas into a creamy, cheesy appetizer that's ready in just 15 minutes—perfect for game day, holiday gatherings, or a quick vegetarian snack.
The secret lies in blending warm, melted cheese directly into the peas while they simmer, creating a velvety texture that clings to every bite. I developed this version after realizing how often simple appetizers get overlooked for more complicated dishes, and it's become a crowd-pleaser at every party I host.
The beauty of this recipe is its simplicity: just four core ingredients—frozen peas, cream cheese, sharp cheddar, and a splash of milk—come together in one pot. No fancy techniques required, just a stovetop and 10 minutes of active time.
The peas absorb the rich, cheesy sauce while maintaining their natural sweetness, resulting in a dish that's creamy yet still bright with pea flavor. This is the kind of appetizer that disappears quickly, so plan to make extra.
What you'll end up with is a creamy, cheesy pea dip that's smooth, flavorful, and impossible to resist. The texture is luxurious—like a cross between hummus and mac and cheese—but with the fresh, vibrant taste of peas.
Serve it warm with toasted baguette slices, crackers, or even as a side to grilled meats. The best part? It reheats beautifully, making it ideal for meal prep or feeding a crowd.
For extra depth, consider adding a sprinkle of smoked paprika or fresh herbs like parsley before serving. This recipe works equally well as a standalone appetizer or as a side dish for soups and salads. Let's get cooking—your taste buds will thank you.
Ingredients for cheese peas
Four core ingredients transform frozen peas into creamy, cheesy bites perfect for any gathering.
| Ingredient | Amount | Notes |
|---|---|---|
| Frozen Peas 🌱 | 1 ½ cups | Thawed if frozen, no need to drain |
| Cream Cheese 🧀 | 8 oz | Full-fat for best creaminess |
| Sharp Cheddar Cheese 🧀 | 1 cup | Shredded, sharp flavor preferred |
| Whole Milk 🥛 | ¼ cup | Warmed slightly for smoother blend |
| Butter 🧈 | 2 tbsp | Unsalted for flavor control |
| Garlic Cloves 🧄 | 2 cloves | Minced for subtle garlic flavor |
| Salt 🧂 | ½ tsp | Adjust to taste after blending |
| Black Pepper 🌶️ | ¼ tsp | Freshly ground for best flavor |
| Smoked Paprika 🌶️ | ¼ tsp | Optional for extra depth (optional) |
| Fresh Parsley 🌿 | ¼ cup | Chopped, for garnish (optional) |
The cream cheese is the star here—don't skimp on quality. Philadelphia brand works best, but any full-fat cream cheese will do. The sharp cheddar should be real sharp, not mild—it makes all the difference. I grab mine from the cheese counter at Whole Foods or the shredded block at Trader Joe's (it melts better than pre-shredded). Frozen peas? Green Giant or Birds Eye are my go-tos—they're consistently sweet and tender. If you're using fresh peas, blanch them first to soften them up.
No cream cheese? Cottage cheese or ricotta can work in a pinch, but the texture won't be as smooth. Short on sharp cheddar? Pepper jack or Gouda add different but delicious flavors. The milk can be any kind—whole, 2%, or even almond milk if you're avoiding dairy. Want to skip the butter? Olive oil or extra milk works too. The garlic is optional but adds a nice depth—just don't overdo it. And if you're feeling fancy, add a pinch of nutmeg for warmth.
This reheats like a dream—honestly tastes better the next day once everything melds. Keeps for 4-5 days in the fridge, freezes for 3 months if you want to prep ahead. I always make a double batch because it disappears fast. Serve it warm with toasted baguette slices or crackers—the crispy contrast makes it even better. Garnish with parsley if you've got it, but no judgment if you skip it.
Why You'll Love This Recipe
- Fridge Raid Ready: I swear by this recipe because it uses stuff I already have—no last-minute grocery runs. Frozen peas? Already in the freezer. Cream cheese and cheddar? Probably hiding in my fridge. Just add milk and butter, and boom—dinner’s sorted.
- Creamy Cheesy Magic: The combo of sharp cheddar and cream cheese melts into those peas like a dream. It’s rich but not heavy, tangy but not overpowering—exactly the kind of comfort food that makes me forget about my to-do list.
- Lunchbox Hero: Between us, this is my go-to for packed lunches. Cold or warm, it’s always a hit—whether I’m feeding my kids after school or sneaking a portion for my own lunch break. The peas stay bright, and the cheese stays creamy even after a day in a container.
- Budget-Friendly Flex: I make this at least twice a month because it’s cheap but feels fancy. A block of cheddar and a tub of cream cheese stretch forever, and frozen peas? The most affordable veggie out there. Plus, leftovers taste just as good reheated as they do fresh.
Step-by-step instructions for cheese pea bites
Here's how to make these creamy, savory bites in record time—no fancy skills needed.
Warm the Peas and Prepare the Cheese
Start by microwaving the 1.5 cups frozen peas for 2-3 minutes until they're thawed and heated through. They should be soft but still hold their shape—no need to drain them. While they warm, shred the 1 cup sharp cheddar cheese using a box grater or food processor. The finer the shreds, the smoother your final mixture will be.
In a medium saucepan, melt the 2 tbsp butter over medium heat. Add the 2 cloves minced garlic and cook for 30 seconds until fragrant—just until you smell that fresh garlic aroma. Remove the pan from heat immediately to prevent burning. This quick step builds flavor without overpowering the dish.
Create the Creamy Cheese Base
In a large mixing bowl, combine the 8 oz cream cheese and 0.25 cup warmed whole milk. Use a hand mixer or whisk to blend until completely smooth—there should be no lumps. The milk helps create a silky texture while keeping the dish rich and flavorful. If the mixture looks too thick, add 1-2 teaspoons more milk until it reaches a smooth, pourable consistency.
Add the melted butter-garlic mixture to the cream cheese blend and stir well. Then fold in the shredded cheddar cheese until fully incorporated. Sprinkle in the 0.5 tsp salt, 0.25 tsp black pepper, and 0.25 tsp smoked paprika (if using) and mix thoroughly. The paprika adds a subtle smokiness that pairs perfectly with the peas and sharp cheddar.
Combine and Cook to Perfection
Drain any excess liquid from the warmed peas (if needed) and add them to the cheese mixture. Gently fold everything together until the peas are evenly distributed. The mixture should be thick but still spreadable—like a rich, herby cheese dip. If it's too loose, let it sit for 2-3 minutes to thicken slightly before proceeding.
Transfer the mixture to a small baking dish or skillet and place it in the oven preheated to 350°F. Bake for 10-12 minutes until the top is lightly golden and the edges are just starting to crisp. You're looking for a subtle color change—not deep browning—so keep an eye on it. The peas should be heated through but still tender.
Finish and Serve Warm
Remove the dish from the oven and let it cool for 2-3 minutes. Then, garnish with the 0.25 cup chopped fresh parsley for a pop of color and freshness. The parsley brightens up the dish and adds a nice contrast to the creamy, savory flavors. Serve immediately while warm—this is when the cheese peas taste their absolute best.
For serving, spoon the cheese peas onto toasted bread, crackers, or even as a dip for veggies. The combination of creamy cheese, sweet peas, and sharp cheddar makes this a crowd-pleaser that's ready in just 15 minutes. Store any leftovers in the fridge for up to 3 days, reheating gently in the microwave or oven to maintain texture.
Pro Tips For Making Cheese Peas
- Thaw Peas First: Frozen peas straight from the bag release ice water that turns your creamy sauce into a sad, watery mess. Toss them in a colander under warm running water for 30 seconds before cooking—just enough to break the ice crystals without cooking them. Trust me, your sauce will thank you.
- Melt Cheese Slowly: Dump cold cream cheese and cheddar into hot milk, and you’ll end up with scrambled cheese curds. Instead, cut the cream cheese into small cubes and grate the cheddar—then stir them into the warm (not boiling) milk over low heat. Stir constantly until it’s just melted, or you’ll get lumps that won’t disappear.
- Skip the Boil: Peas don’t need to boil—they’ll cook in the sauce. Simmer them in the milk-butter mixture for 3-4 minutes after the cheese melts, just until they’re bright green and tender. Boiling them first makes them mushy and dulls their sweetness.
- Salt in Stages: Add half the salt when you melt the butter, then taste the sauce before adding the rest. Sharp cheddar and cream cheese pack enough salt that you’ll overdo it if you dump it all in at once. Adjust as you go—this isn’t a science experiment, but close enough.
Pro cooking tips for this dish
Cheese Consistency Secrets
For ultra-smooth cheese peas, always use freshly shredded sharp cheddar—pre-shredded cheese contains anti-caking agents that prevent proper melting. I shred mine in a food processor for the finest texture. If your mixture looks grainy, add 1 teaspoon extra milk and blend again.
The key is patience: let the cheese and milk sit together for 5 minutes before adding peas to ensure a silky base. 🧀
Pea Texture Mastery
Overcooking peas turns them mushy, so thaw them thoroughly (microwave for 2-3 minutes) before mixing. If using fresh peas, blanch them for 2 minutes in boiling water first. For extra tenderness, add 1 teaspoon lemon juice to the cheese mixture—it brightens the peas and prevents them from turning gray.
The ideal texture is creamy but still pea-like, not a puree. 🌱
Garlic Timing Trick
Garlic burns quickly, so cook it only 30 seconds in butter before removing from heat. For deeper flavor, use garlic powder (½ teaspoon) instead—it blends seamlessly without risk of bitterness.
If you love garlic, add a roasted clove to the baking dish during the final 5 minutes of oven time for concentrated aroma. 🧄
Oven vs. Stovetop Finish
The oven creates a golden crust while keeping peas tender, but you can finish on the stovetop for faster results. If stovetop-baking, use low heat and stir constantly for 5-7 minutes—add 1 tablespoon milk if it starts to stick.
For extra crispiness, sprinkle breadcrumbs on top before baking. The oven method is foolproof for beginners, though. 🔥
Reheating Like a Pro
Microwave reheating makes peas watery, so reheat in a skillet over low heat with 1 tablespoon butter for 3-4 minutes, stirring often. For oven reheating, cover with foil and bake at 325°F for 10 minutes.
Add a splash of milk if it looks dry—this restores creaminess without overcooking. The texture improves overnight, so leftovers taste even better. ⏰
Cheese Substitutions
For a vegan version, swap cream cheese for silken tofu (blended with lemon juice) and cheddar for nutritional yeast. For extra richness, add 2 tablespoons sour cream to the base.
If you only have mild cheddar, boost flavor with ½ teaspoon smoked paprika or 1 teaspoon Dijon mustard. Each substitution changes the texture slightly, so adjust milk as needed. 🌱
Nutrition facts
Frequently asked questions
Can I make this recipe with fresh peas instead of frozen?
Yes, but you'll need to blanch them first! Drop fresh peas into boiling water for 2 minutes, then shock in ice water to stop cooking. This softens them properly for blending with the cheese. Frozen peas are more convenient since they're pre-cooked and just need thawing.
What if my cheese mixture gets too thick or too thin?
Too thick? Add 1 teaspoon milk at a time until smooth. Too thin? Let it sit 5 minutes uncovered to thicken naturally, or bake for 2 extra minutes at 350°F. The ideal consistency is spreadable but holds shape when chilled.
Can I prepare this ahead of time for parties?
Make it 1 day ahead and store in an airtight container. Reheat gently in a skillet with 1 tbsp butter for 3-4 minutes—leftovers actually taste better as flavors meld. For serving, transfer to a baking dish and warm at 325°F for 10 minutes covered with foil.
What are good ways to serve these cheese peas?
Try these crowd-pleasing ideas: spoon onto toasted baguette slices, serve as a dip with crudités, or pair with warm pita bread. For a heartier meal, top with crispy fried onions or a sprinkle of crumbled bacon. The creamy texture works well alongside grilled chicken or fish too.
Why did my cheese peas turn out grainy?
Graininess usually means the cheese didn't melt properly. Always use freshly shredded sharp cheddar (not pre-shredded) and let the cheese-milk mixture sit for 5 minutes before adding peas. If it's still grainy, blend with 1 extra teaspoon milk until smooth. For extra silkiness, add 1 tbsp sour cream to the base.