Appetizers
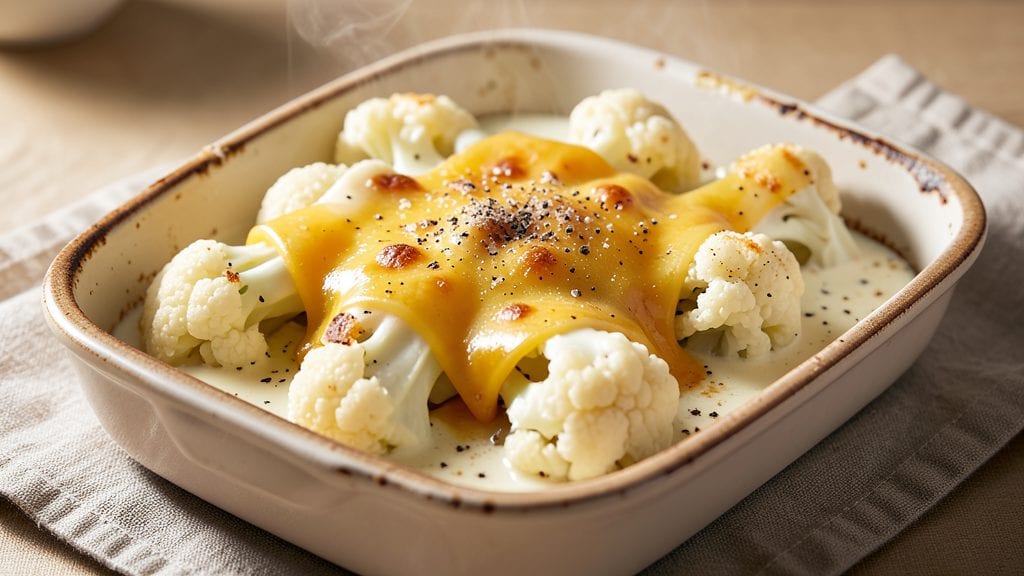
This basic cauliflower cheese recipe delivers the comforting, cheesy goodness you crave with a golden, crispy top and swirls of melty cheese throughout. 💛 I’ve perfected a method that’s foolproof for beginners but still delivers restaurant-quality results—no fancy techniques required.
The key lies in the cheese sauce, which clings to every floret while developing that signature crispy crust.
What sets this recipe apart is its balance of simplicity and indulgence. You’ll start with fresh cauliflower cut into even florets for consistent cooking, then build a rich, velvety cheese sauce using sharp cheddar and a touch of cream.
The sauce isn’t just flavorful—it’s thick enough to coat every bite while staying creamy, not greasy. Baking transforms it into a golden, bubbling masterpiece with crisp edges and tender centers.
By the time it emerges from the oven, you’ll have a dish that’s crispy on top, gooey inside, and packed with cheesy flavor in every bite. It’s the kind of comfort food that pairs perfectly with crusty bread for dipping or stands alone as a satisfying main.
The best part? This recipe comes together in under an hour, making it ideal for weeknight dinners or meal prep.
Serve it as a side for roasted meats or as a hearty main with a simple green salad. The versatility of this dish means it works for casual family meals or impressing guests—without the fuss. Let’s get started on creating your perfect cauliflower cheese.
Ingredients for basic cauliflower cheese
Fresh cauliflower, sharp cheddar, and a few pantry staples—this is all you need for crispy, cheesy perfection.
| Ingredient | Amount | Notes |
|---|---|---|
| Fresh Cauliflower 🥬 | 1 whole | Cut into even florets |
| Sharp Cheddar Cheese 🧀 | 2 cups | Shredded, aged 6+ months |
| Heavy Cream 🥛 | ½ cup | Full-fat for richness |
| Milk 🥛 | ¼ cup | Whole milk preferred |
| All-Purpose Flour 🌾 | 2 tbsp | For thickening sauce |
| Garlic Cloves 🧄 | 2 cloves | Minced for depth |
| Mustard Powder 🌶️ | ½ tsp | Adds tangy kick |
| Salt 🧂 | 1 tsp | Kosher or sea salt |
| Black Pepper 🌶️ | ½ tsp | Freshly ground preferred |
| Butter 🧈 | 2 tbsp | Unsalted, melted |
| Breadcrumbs 🍞 | ½ cup | Panko for extra crisp |
| Parmesan Cheese 🧀 | ¼ cup | Freshly grated for crunch |
| Olive Oil 🫒 | 1 tbsp | For cauliflower tossing |
The cauliflower is your canvas here. Look for heads with tight florets—loose or yellowing bits mean it's past its prime. Trader Joe's or Whole Foods usually have the freshest, but any grocery store works. Cut the florets into even sizes (about 1.5 inches) so they cook at the same rate. Sharp cheddar is non-negotiable—Cabot or Tillamook are my go-tos, but any aged cheddar with visible crystals will do. The key is the cheese sauce: it needs to be velvety but not greasy, which is why we're using both cream and milk for balance.
No sharp cheddar? Pepper jack or Gruyère add great flavor, though the texture changes slightly. Short on breadcrumbs? Crushed cornflakes or panko work just as well for that crispy topping. The mustard powder might sound odd, but it cuts through the richness—dried mustard works in a pinch. If you're watching calories, swap half the heavy cream for Greek yogurt (it thickens differently, so expect a slightly different texture). And for the love of cheese, don't skip the Parmesan on top—it's what gives that golden crust its crunch.
This reheats beautifully—just cover with foil and pop in the oven for 5-10 minutes. Keeps for 4-5 days in the fridge, though I rarely have leftovers that long. For meal prep, assemble it in a baking dish, refrigerate, then bake straight from cold (add 5-10 extra minutes). The sauce thickens as it cools, so if it looks too thin when you first make it, don't panic—it'll set up nicely once chilled. Freezes for 3 months if you're planning ahead, though texture changes slightly after thawing.
Why You'll Love This Recipe
- One-Pot Wonder: I swear by this recipe because it’s literally one pan—no fussing with multiple dishes. Toss the florets in roasted cheese sauce, broil until golden, and you’re done. (Yes, even on a Tuesday night when you’re exhausted.)
- Cheese Overload: That sharp cheddar melted into a velvety sauce with heavy cream? It’s dangerously addictive. The flour roux keeps it thick and rich, so every bite feels indulgent—without the guilt of a heavy béchamel.
- Leftovers for Days: Make a big batch and reheat it for days—it’s that good. The sauce clings to the cauliflower, so it stays moist even after sitting in the fridge. (My kids beg for it cold in lunchboxes, too.)
- Budget-Friendly Luxury: Fresh cauliflower and sharp cheddar stretch far, and you’re using pantry staples. For under $10, you feed four people a dish that tastes like a fancy pub meal. Honestly, it’s my secret weapon for stretching groceries without sacrificing flavor.
Step-by-step instructions for crispy cauliflower cheese
Here's how to make this classic comfort dish with perfect texture every time.
👨🍳 Step 1: Prep the Cauliflower for Maximum Crisp
Start by cutting the whole fresh cauliflower into even florets, about 1½-inch pieces. Remove any tough stems and separate the florets so they cook uniformly. Here's the thing—don't skip rinsing them first. Give them a quick rinse under cold water and pat completely dry with paper towels. Any moisture left on the florets will make them steam instead of crisp up.
In a large bowl, toss the dry florets with 1 tablespoon olive oil and ½ teaspoon salt. Spread them on a baking sheet in a single layer, cut-side down. This initial drying step is crucial—it ensures those crispy edges we're after. Let them sit at room temperature for 10 minutes while you prep the rest of your ingredients. You'll see the edges start to dry out slightly—that's your signal they're ready for the oven.
🔥 Step 2: Roast Until Golden and Tender
Preheat your oven to 425°F with the rack positioned in the middle. Slide the baking sheet into the oven and roast the cauliflower for 20-25 minutes, stirring once halfway through. You're looking for florets that are golden brown on the edges and tender when pierced with a fork. The internal temperature should reach 165°F—this ensures they're fully cooked while still holding their shape.
Don't walk away during this step. The cauliflower can go from perfect to overdone in just a few minutes, especially if your oven runs hot. If you see any florets browning too quickly, give them a stir to redistribute the heat. Once they're done, remove them from the oven and set aside—they'll stay warm while you work on the cheesy sauce.
🍳 Step 3: Make the Creamy Cheese Sauce
In the same oven, reduce the temperature to 375°F. While the oven heats back up, melt 2 tablespoons butter in a medium saucepan over medium heat. Add the 2 cloves minced garlic and cook for 30 seconds until fragrant—don't let it brown or it'll turn bitter. Stir in the ½ teaspoon mustard powder and cook for another 10 seconds to toast the spices.
Pour in the ½ cup heavy cream and ¼ cup milk, stirring constantly. Let the mixture simmer gently for 2-3 minutes until it begins to thicken slightly. Sprinkle the 2 tablespoons all-purpose flour over the top and whisk vigorously to remove any lumps. The sauce should start to coat the back of a spoon—this is when you know it's thickening properly. If it gets too thick, add a splash of milk to loosen it.
🥘 Step 4: Assemble and Bake to Melty Perfection
Transfer the roasted cauliflower to a greased 9x13-inch baking dish. Pour the cheese sauce evenly over the top, then sprinkle with the 2 cups shredded sharp cheddar cheese and ½ teaspoon black pepper. Here's where the magic happens: mix the ½ cup breadcrumbs with the ¼ cup grated parmesan cheese in a small bowl, then sprinkle this mixture evenly over the top of the casserole. The breadcrumbs will create that coveted crispy crust we're after.
Return the baking dish to the oven and bake for 15-20 minutes until the top is deep golden brown and bubbly. The cheese should be fully melted with just a few small bubbles breaking through the surface. If you're worried about it browning too quickly, tent the dish with foil for the last 5 minutes of baking. Let it rest for 5 minutes before serving—this gives the cheese time to set slightly and makes it easier to cut.
🍽️ Step 5: Serve with Crispy Top and Melty Cheese
Use a spatula to loosen the edges of the cauliflower cheese from the baking dish, then slide it onto a serving platter. The top should be beautifully crispy with golden-brown breadcrumbs, while the cheese inside should be melted and stretchy. Cut into squares and serve immediately while the cheese is still gooey and warm.
For the ultimate experience, serve with a simple side salad or steamed green beans. The contrast of the crispy, cheesy cauliflower with fresh greens is what makes this dish a classic. Real talk: the first bite should deliver that perfect combination of crispy top, creamy sauce, and melty cheese—no dry florets allowed!
Pro Tips For Making Basic Cauliflower Cheese
- Cut Cauliflower Small: DESCRIPTION: No bigger than a nickel—any larger and it’ll stay undercooked while the edges burn. I learned this the hard way after serving mushy florets to skeptical guests. A sharp knife and a steady hand make all the difference.
- Melt Cheese Slowly: DESCRIPTION: Low heat only—no rushing. Sharp cheddar separates and turns grainy if you crank the stove, and you’ll end up with a gluey mess instead of a velvety sauce. Stir constantly and let it bubble gently.
- Skip the Boil: DESCRIPTION: Steam the cauliflower instead—it keeps the texture tender without turning it to mush. Five minutes in the microwave (covered) works in a pinch, but a steamer basket over boiling water guarantees even cooking.
- Use Equal Parts Cream: DESCRIPTION: Heavy cream and milk in a 1:1 ratio—any more cream and the sauce gets too rich, too fast. This balance keeps it smooth without overpowering the cheddar’s sharpness. (Yes, even if you’re impatient like me.)
Troubleshooting this dish
Sauce Too Thin?
If your cheese sauce separates or looks too watery, you’ve likely undercooked the roux. The key is patience—simmer the cream and milk mixture for 3-4 minutes before adding flour. For extra insurance, whisk in 1 teaspoon cornstarch mixed with 1 tablespoon cold water at the end.
This creates a silky, velvety texture that clings perfectly to the cauliflower. 💡
Cheese Not Melty Enough
Overmixing the sauce after adding cheese can create lumps and prevent proper melting. Instead, sprinkle shredded cheddar in layers—first over the sauce, then after adding breadcrumbs. For extra meltiness, use a mix of sharp cheddar (70%) and Gruyère (30%).
Gruyère’s lower melting point ensures gooeyness. Cover the dish with foil during the last 10 minutes of baking to trap steam.
Dry Cauliflower Florets
If your cauliflower turns out dry, it likely didn’t roast long enough or was overcrowded. For next time, roast at 425°F for 25-30 minutes (not stirring) until edges are golden and internal temp hits 165°F.
Toss florets with 1 tablespoon olive oil before roasting to prevent moisture loss. A light spray of water before baking can also help steam the centers slightly for tenderness.
Breadcrumbs Not Crispy
Moisture is the enemy of crispy breadcrumbs. Pat the roasted cauliflower completely dry before assembling, and ensure your sauce isn’t too wet. For extra crunch, toast ½ cup panko breadcrumbs in a dry pan over medium heat for 2 minutes before mixing with Parmesan.
Spread them evenly in a thin layer—thick clumps won’t crisp properly. Bake uncovered for the final 5 minutes to maximize browning.
Sauce Too Greasy
Heavy cream can make the sauce separate if not balanced properly. Reduce the cream by 2 tablespoons and replace with ¼ cup whole milk for a lighter texture.
For an extra insurance policy, whisk in 1 tablespoon Greek yogurt at the end—it adds tang and prevents greasiness while keeping the sauce creamy. Simmer the sauce longer (up to 5 minutes) to evaporate excess fat.
Uneven Baking
If the edges brown too fast while the center stays undercooked, your oven runs hot. Tent the dish with foil for the first 15 minutes, then remove to crisp the top.
For even cooking, place the baking dish on the middle rack and avoid opening the oven door during baking. If your oven has hot spots, rotate the dish halfway through baking. A dark-colored baking dish also helps absorb heat more evenly than glass.
Nutrition facts
Frequently asked questions
Can I make this recipe without heavy cream?
For a lighter version, replace the ½ cup heavy cream with ½ cup whole milk and 2 tablespoons Greek yogurt. The yogurt adds tang and helps thicken the sauce naturally. If you're dairy-free, use ½ cup full-fat coconut milk instead, but expect a slightly different texture.
How do I get the perfect crispy top?
The secret is in the breadcrumb mix and baking technique. Use panko breadcrumbs for extra crunch, and toast them lightly in a dry pan for 2 minutes before mixing with Parmesan. Spread them in an even, thin layer—thick clumps won’t crisp properly. Bake uncovered for the final 5 minutes to maximize browning. A dark-colored baking dish also helps create that golden crust.
Can I use frozen cauliflower instead of fresh?
Frozen cauliflower works in a pinch, but it won’t give the same crispy texture. If you must use it, thaw and pat completely dry, then roast at 425°F for 30-35 minutes, stirring halfway. For best results, stick with fresh cauliflower—its natural moisture helps create that signature crispy edge.
What’s the best cheese substitute if I don’t have sharp cheddar?
Try Gruyère (for extra meltiness) or pepper jack (for a spicy kick). A mix of mozzarella and Parmesan also works well—mozzarella adds stretch while Parmesan boosts umami. Just avoid pre-shredded cheese (it contains anti-caking agents that prevent proper melting). For a vegetarian twist, nutritional yeast adds a cheesy flavor without dairy.
How long can I store leftovers?
Leftovers keep well in the fridge for 4-5 days, covered tightly. Reheat in the oven at 350°F for 10-15 minutes, covered with foil, until warm through. For freezing, assemble the dish, bake as directed, then cool completely before wrapping airtight. It freezes for up to 3 months, though texture may change slightly after thawing.