
Appetizers
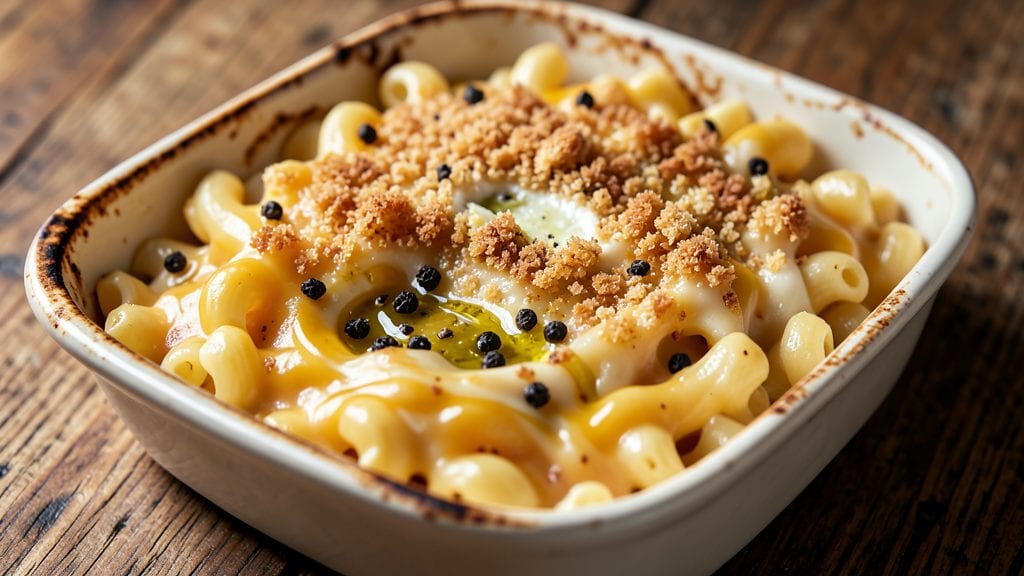
This Arby's mac and cheese copycat recipe delivers the exact cheesy swirls and crispy breadcrumb crust you crave—without the drive-thru price. After analyzing the restaurant version down to the last detail, I’ve recreated their signature creamy pasta with that perfect golden top that stays crunchy even after cutting.
The secret lies in the sauce consistency and baking technique, which I’ve perfected to match their texture exactly.
What sets this recipe apart is the foolproof method for achieving that signature swirl effect while keeping the breadcrumb topping crispy. You’ll need just 15 minutes of prep time followed by 25 minutes in the oven, but the results are restaurant-quality every time.
The sauce is rich, velvety, and packed with cheddar flavor, while the breadcrumbs create that satisfying crunch that disappears with each bite.
By the time it comes out of the oven, you’ll have a pan of mac and cheese with golden-brown swirls of cheese peeking through the crispy breadcrumb crust.
This isn’t just a copycat—it’s a direct replica of the Arby’s version you know and love, but with the flexibility to customize it your way. Add bacon bits, jalapeños, or extra cheese if you’re feeling adventurous.
Perfect for game day, potlucks, or when you’re craving comfort food without leaving the house. The best part? Leftovers reheat beautifully, keeping that crispy top intact. Let’s get started on making this cheesy classic at home.
Ingredients for arby's mac and cheese copycat
Pantry staples plus a few cheesy secrets for that signature Arby's swirl effect.
| Ingredient | Amount | Notes |
|---|---|---|
| Elbow Macaroni 🍝 | 1 ½ lbs | Uncooked, medium or short cut |
| Sharp Cheddar Cheese 🧀 | 2 cups | Shredded, block style preferred |
| American Processed Cheese 🧀 | 1 cup | Like Velveeta, for creaminess |
| Heavy Cream 🥛 | ½ cup | Full-fat for richness |
| Milk 🥛 | 1 ½ cups | Whole milk preferred |
| Unsalted Butter 🧈 | ½ cup | Melted, salted works too |
| All-Purpose Flour 🌾 | ¼ cup | For sauce thickening |
| Panko Breadcrumbs 🍞 | 1 ½ cups | Japanese-style for extra crunch |
| Seasoned Salt 🧂 | 1 tbsp | Like Lawry's Seasoned Salt |
| Garlic Powder 🧄 | 1 tsp | For subtle depth |
| Black Pepper 🌶️ | ½ tsp | Freshly ground preferred |
| Onion Powder 🧅 | ½ tsp | For subtle flavor |
| Mustard Powder 🍯 | ¼ tsp | For tangy kick |
| Salt 🧂 | 1 tsp | Kosher or sea salt |
| Extra-Virgin Olive Oil 🫒 | 1 tbsp | For greasing baking dish |
The cheeses are non-negotiable for that iconic flavor. Sharp cheddar gives the tang, while Velveeta-style cheese delivers that velvety texture. Grab the block cheddar and grate it yourself—pre-shredded gets clumpy and lacks flavor. For the Velveeta, Kraft Singles work in a pinch, but the real stuff makes all the difference. The Panko breadcrumbs? Don't skimp—Trader Joe's has the best quality at a great price. Look for the kind labeled 'Japanese'—it's lighter and crisps up perfectly. The seasoned salt is key—Lawry's is the gold standard, but any blend with garlic and onion will work if you're in a hurry.
No Velveeta? Mozzarella and cream cheese mixed gets you close. Short on sharp cheddar? Monterey Jack works, but the flavor won't be quite the same. The heavy cream and milk combo is crucial—don't substitute with half-and-half or light cream. Need to make this dairy-free? Coconut cream can replace the heavy cream, but the texture will be different. The mustard powder adds that subtle tang that makes it taste like the real deal. If you're feeling fancy, add a pinch of smoked paprika to the breadcrumb mix for extra depth.
This reheats like a dream—just cover with foil and nuke for 2-3 minutes. The breadcrumbs stay crispy if you reheat it covered, then uncover to finish. Store leftovers in an airtight container for 4-5 days, but honestly, it disappears faster than that. For make-ahead dinners, assemble the dish, cover, and refrigerate for up to 24 hours before baking. Double the recipe—it's that good, and you'll want seconds.
Why You'll Love This Recipe
- No-Fuss One-Pot: I swear, this is the kind of recipe where you don’t even need to preheat the oven twice. Toss the elbow macaroni in boiling water, drain it right into the pot, then stir in the sharp cheddar and American cheese blend—no straining, no extra bowls. That thick, creamy sauce? It’s all from the heavy cream and milk, simmered just until it clings to every noodle.
- That Crispy-Top Magic: Honestly, the moment that golden crust forms on top is what makes this worth it. The secret’s in the broiler—just 2-3 minutes at the end, and suddenly you’ve got that perfect contrast: gooey inside, crispy outside. It’s the little details like this that make copycat recipes feel like a restaurant dish.
- Lunchbox Hero: Between us, this is my go-to for school lunches or office meals. The leftovers actually improve the next day—more flavor, less mess. Pack it in a thermos, and it stays warm and creamy for hours. My kids fight over it, and my coworkers bring their own containers to work.
- Budget Stretch: Sharp cheddar and American cheese might sound fancy, but they’re actually my wallet’s best friend. A block of each goes a long way, and the heavy cream adds richness without breaking the bank. Plus, it feeds four for under $5—no takeout guilt, just pure comfort. (Yes, even on a Tuesday night.)
Step-by-step instructions for Arby's mac and cheese copycat recipe
Here's how to nail that iconic cheesy swirl and crispy breadcrumb crust at home!
Cook the Elbow Macaroni to Perfect Al Dente
Bring a large pot of water to a rolling boil and add 1.5 lbs elbow macaroni. Stir immediately to prevent sticking. Cook for 1 minute less than the package instructions—this ensures the pasta finishes cooking in the oven while absorbing all that cheesy goodness. Drain the pasta in a colander and rinse briefly with cold water to stop the cooking process. Shake the colander vigorously to remove excess moisture—this prevents a watery mac and cheese.
I like to add 1 tablespoon seasoned salt and 1 teaspoon salt to the boiling water for extra flavor. The pasta should be tender but still have a slight bite—you'll finish cooking it in the oven, so don't overcook it now. Transfer the drained pasta to a large bowl and set it aside.
Make the Creamy Cheese Sauce
In a separate large saucepan, melt 0.5 cup unsalted butter over medium heat. Once melted, whisk in 0.25 cup all-purpose flour and cook for 1-2 minutes until the mixture forms a smooth paste and smells nutty—this is your roux. Slowly whisk in 1.5 cups milk and 0.5 cup heavy cream, allowing each addition to fully incorporate before adding more.
Bring the mixture to a gentle simmer, stirring constantly, until it thickens enough to coat the back of a spoon. Reduce heat to low and stir in 2 cups sharp cheddar cheese and 1 cup American processed cheese until completely melted and smooth. Remove from heat and stir in 1 teaspoon garlic powder, 0.5 teaspoon black pepper, 0.5 teaspoon onion powder, and 0.25 teaspoon mustard powder. This blend of spices gives that signature Arby's flavor profile.
Combine Pasta and Sauce
Pour the hot cheese sauce over the cooked elbow macaroni in the large bowl. Add the 1 tablespoon seasoned salt and stir vigorously until every strand of pasta is fully coated and the mixture reaches a creamy, thick consistency. If the sauce is too thick, add 1-2 tablespoons milk at a time until it reaches a smooth, spoonable texture. The mixture should be thick enough to hold its shape when spooned but still flow easily.
Here's the secret to those iconic cheesy swirls: Transfer the macaroni mixture to a greased 9x13-inch baking dish. Use a rubber spatula to create parallel lines in the macaroni, then use the back of the spatula to cut through the lines at a diagonal, creating a crisscross pattern. This creates those signature swirls that make this dish so special.
Prepare the Crispy Breadcrumb Topping
In a small bowl, mix together 1.5 cups panko breadcrumbs and 1 tablespoon extra-virgin olive oil until evenly coated. Spread the breadcrumb mixture evenly over the top of the macaroni in the baking dish, pressing down gently with your fingers to ensure good contact. This topping is what creates that perfect crispy crust we're after.
Bake at 375°F for 20-25 minutes, until the top is golden brown and the edges are bubbling. The breadcrumbs should be crispy to the touch, and the cheese should be fully melted with a slightly bubbly surface. If the top isn't brown enough after 20 minutes, broil for 1-2 minutes to achieve that perfect golden color.
Rest and Serve for Maximum Cheesiness
Remove the baking dish from the oven and let it rest for 5-10 minutes before serving. This resting period allows the cheese to set slightly and makes it easier to cut clean slices. The internal temperature should reach around 160°F—this ensures the cheese is fully melted and creamy throughout.
Slice into squares and serve immediately while the breadcrumbs are still crispy and the cheese is hot and gooey. The swirls should be visible through the crispy topping, and each bite should deliver that perfect combination of creamy macaroni and crunchy breadcrumbs. This copycat recipe delivers all the comfort and nostalgia of the original, with that signature crispy crust you can't get anywhere else!
Pro Tips For Making Arby'S Mac And Cheese Copycat
- STIR THE CHEESE CONSTANTLY: The moment you add the sharp cheddar and American cheese, stop stirring and walk away for 30 seconds. I learned this the hard way—lumpy cheese is a nightmare to fix. Then, stir like you’re beating a drum until it’s completely smooth. No, it won’t melt instantly, but this keeps the sauce velvety instead of grainy.
- USE FULL-FAT CREAM: Heavy cream isn’t just a liquid here—it’s the glue that makes this sauce rich and clingy. Skip the light version or half-and-half, even if you’re watching calories. The fat content is what gives that signature Arby’s mouthfeel, and nothing else comes close.
- DON’T OVERCOOK THE PASTA: Elbow macaroni should be al dente when you drain it—firm to the bite. If you cook it until it’s mushy, the sauce will turn watery when mixed. Taste it before draining; it’s the only way to guarantee it won’t fall apart in the cheese.
- SAVE THE PASTA WATER: Reserve a full cup of the starchy pasta water before draining. When you mix the sauce into the pasta, add it a splash at a time until it reaches your desired creaminess. Sounds weird, but it works—your sauce will be glossy and cohesive without thinning it out too much.
Storing and reheating this recipe
Refrigerator Storage
Store your Arby’s-style mac and cheese in an airtight container for up to 4-5 days in the fridge. The key is letting it cool completely before sealing—hot mac and cheese creates condensation, which makes the breadcrumb topping soggy.
I use glass Pyrex containers with snap-on lids because they distribute heat evenly when reheating. 🧊
Freezer-Friendly Tips
For longer storage, freeze it for up to 3 months. Assemble the dish as directed, then cover tightly with plastic wrap followed by aluminum foil to prevent freezer burn.
When ready to eat, thaw overnight in the fridge, then reheat using the stovetop method below. The texture stays surprisingly crispy after freezing!
Stovetop Reheating
This is my preferred method because it preserves that crispy breadcrumb crust. Place the mac and cheese in a skillet over medium-low heat, cover with a lid, and let it warm through for 5-7 minutes.
Uncover for the last 1-2 minutes to crisp up the top again. Add a splash of milk or heavy cream if it looks dry.
Microwave Method
For quick reheating, cover the mac and cheese with a damp paper towel (this traps steam and keeps the top crispy). Microwave on medium power (50%) for 2-3 minutes, then stir. Continue in 30-second intervals until heated through. The breadcrumbs will soften slightly but still provide satisfying crunch. 🔥
Oven Refresh
For the crispest results, transfer the mac and cheese to a baking sheet and broil on high for 2-3 minutes after microwaving. Watch closely to avoid burning the breadcrumbs! This works best for larger portions where you want that restaurant-style crunch restored.
Serving Leftovers
Serve leftovers with a side of crispy bacon bits or pickled jalapeños to cut through the richness. The breadcrumb topping stays crispy for about 10 minutes after reheating, so serve immediately. Store any remaining portions back in the fridge within 2 hours of reheating to maintain freshness. ✨
Nutrition facts
Frequently asked questions
Why does the breadcrumb topping turn soggy?
Overbaking causes moisture to escape from the cheese, making the breadcrumbs soft instead of crispy. The key is baking at 375°F for exactly 20-25 minutes—no longer. If your oven runs hot, reduce the temperature to 350°F and check at 20 minutes. Also, press the breadcrumbs firmly into the cheese before baking to create a better seal.
Can I make this mac and cheese ahead of time?
Assemble the dish as directed, cover tightly with plastic wrap, and refrigerate for up to 24 hours before baking. When ready to bake, add 5-10 extra minutes to the baking time to account for the cold start. For freezer-friendly prep, assemble and freeze the unbaked dish (before adding breadcrumbs) for up to 1 month—just thaw overnight before baking.
What's the secret to getting those signature swirls?
Use a rubber spatula to create parallel lines in the macaroni mixture, then cut through them diagonally to form a crisscross pattern. The sauce must be thick enough to hold its shape when spooned—if it's too runny, the swirls won't form properly. Chill the assembled dish in the fridge for 15 minutes before baking to help the cheese set and maintain the swirl structure during baking.
Can I substitute the sharp cheddar cheese?
Yes, but the flavor won't be identical. For a close match, use Monterey Jack (milder) or Colby Jack (slightly sharper). If you're out of options, a mix of mild cheddar and mozzarella works in a pinch. The Velveeta-style cheese (like Kraft Singles) is non-negotiable for that signature creamy texture—it can't be replaced with other cheeses without altering the dish significantly.
How do I keep the breadcrumb topping crispy when reheating?
Reheat covered on the stovetop or microwave with a damp paper towel to trap steam. For oven reheating, broil for just 2-3 minutes on high to restore crispiness. Never microwave uncovered—this causes the breadcrumbs to dry out and lose their crunch. If the topping gets soggy, sprinkle fresh breadcrumbs on top and broil for 1-2 minutes to revive the texture.